Introduction
A hydraulic tank leak rarely announces itself. What starts as minor seepage at a fitting or weld seam can escalate into fluid contamination, system pressure loss, and costly downtime before most maintenance teams catch it. The hydraulic reservoir — the component that stores, conditions, and supplies fluid across industrial, mobile, and heavy equipment systems — is often the last place operators think to inspect.
The numbers make the stakes clear. The global oil industry loses over 500 million liters of hydraulic oil to leaks annually. A single leak dripping at just one drop per second adds up to 420 gallons lost over 12 months.
Roughly 75–80% of all hydraulic system failures trace back to fluid contamination — contamination that typically enters through system breaches, faulty seals, and uncovered breathers. When the tank itself is the source, every downstream component, from pumps to control valves, faces accelerated wear and potential failure.
This guide covers the most common hydraulic tank leak problems, their root causes, a step-by-step repair process, how to decide between fixing and replacing, and when to call in a professional.
Key Takeaways
- Hydraulic tank leaks typically stem from weld seam cracks, corrosion pitting, failed fittings or drain plugs, or degraded internal lining
- Most minor leaks can be repaired with proper preparation, re-welding, or hydraulic-rated epoxy compounds
- Never weld a tank containing hydraulic fluid—drain completely and clean before any heat-based repair to avoid fire or explosion
- Widespread corrosion or recurring failures call for professional relining or full tank replacement
- If severity is unclear, consult a professional before damage escalates into a costlier repair
What Is a Hydraulic Tank?
A hydraulic tank (reservoir) is a sealed container—typically fabricated from steel, aluminum, or polyethylene—that stores hydraulic fluid, allows heat dissipation, and separates entrained air and contaminants from the fluid before it re-enters the circuit.
Unlike hoses, cylinders, or valves, the tank is the system's base component. A leak here does more than lose fluid: it risks contaminating the entire system and compromising every downstream component.
Hydraulic tanks range from small mobile equipment reservoirs (excavators, track carriers) to large industrial fixed tanks. Repair complexity and cost vary significantly based on tank size, material, and fluid type stored.
Primary Functions:
- Compensates for oil volume changes caused by temperature variations, leakage, and fluid compressibility
- Cools fluid through natural convection across the tank surface
- Allows entrained air bubbles to escape before fluid re-enters the pump
- Settles solid contaminants and free water to the tank bottom
Tank size directly affects how much fluid volume is at risk during a leak — and how involved the repair will be.
Industry-Standard Sizing:
- Stationary hydraulic systems: 3 to 5 times the pump flow rate (e.g., a 40 L/min pump requires a 120-liter tank)
- Mobile hydraulic systems: 1.5 to 2 times the pump flow rate to save weight and space
Common Hydraulic Tank Leak Problems and Their Root Causes
Hydraulic tank leaks fall into predictable failure categories. Correctly identifying the problem type determines whether a field repair works or fails.
Weld Seam Cracks
Symptoms: Visible hairline cracks along weld joints, slow seepage that worsens under pressure or vibration, possible fluid discoloration from contamination ingress.
Root Causes: Thermal cycling stress, improper original weld quality, mechanical shock or vibration fatigue over time (especially common in mobile equipment like excavators). Cyclic loading from vacuum pressure (oil suction) and overpressure (oil return) causes side wall bending, leading to tensile stresses and fatigue cracks along weld fusion lines.
Hydrogen-induced cold cracking can also occur at the toe of repair welds — a result of high heat-affected zone (HAZ) hardness combined with excessive hydrogen in the arc atmosphere.
Corrosion Pitting and Wall Thinning
Symptoms: Rust-stained fluid, pinhole leaks across the tank surface (not at joints), visible pitting on the tank exterior or interior wall.
Root Causes: Moisture contamination inside the tank, lack of internal protective coating, incompatible fluids, or years of exposure in high-humidity or corrosive environments. Moisture enters through multiple paths:
- Condensation as warm air cools inside the tank
- Worn seals and uncovered breathers or vents
- Incompatible fluid introduction during maintenance
Free water settles at the tank bottom, causing surface corrosion, internal rust, and accelerated abrasive wear. Corrosive species (sulfides, chlorides) worsen hydrogen embrittlement, creating localized pitting that acts as stress concentrators.
Fitting, Drain Plug, and Port Failures
Symptoms: Fluid weeping around threaded connections, fittings, or drain plugs—typically minor drips that intensify over time.
Root Causes: Thread wear, over-tightening causing thread damage, seal/O-ring degradation, or galvanic corrosion between dissimilar metals at fittings.
Common Leak Causes by Seal Style:
| Seal Style | Sealing Mechanism | Common Leak Causes |
|---|---|---|
| Tapered Threads (NPT) | Thread interference + sealant | Cross-threading, wrong sealant, split port |
| JIC 37° Flare | Metal-to-metal flare seat | Seat scoring, cone damage, over-torque |
| O-Ring Face Seal (ORFS) | O-ring compression | Cut O-ring, nicked face, missing seal |
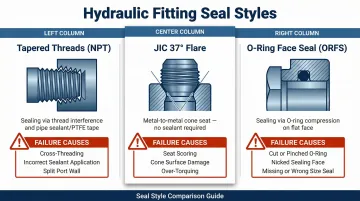
Leaks at straight-thread ports often indicate washer or O-ring failure rather than thread damage. Over-tightening is a separate issue — it distorts sealing seats and intensifies leaks rather than stopping them.
Internal Lining Degradation
Symptoms: Fluid contamination with particles or discoloration, accelerated component wear elsewhere in the system, apparent leaks that don't trace to an external point.
Root Causes: Original protective coating (if any) has failed due to chemical attack, age, or improper application — leaving bare metal exposed to fluid and allowing corrosion to breach the tank wall from the inside out.
Polyurethane and epoxy coatings disbond, flake, or deteriorate over time. When they do, coating fragments circulate through the system as particulate contamination, driving abrasive and erosive wear on downstream components.
Consequences of Ignoring These Problems:
- Reduced system pressure
- Pump and valve damage from contaminated fluid
- Environmental liability from fluid spills
- Safety hazards from flammable hydraulic fluid exposure
- Accelerated bearing wear — dropping dissolved water from 400 ppm to 25 ppm can extend bearing fatigue life by 5×
How to Repair a Hydraulic Tank Leak: Step-by-Step
Attempting to repair a hydraulic tank without proper preparation—especially skipping fluid drainage or surface cleaning—is the leading cause of failed repairs and repeat failures.
Step 1: Isolate and Prepare the Tank
Critical safety requirements:
- Shut down the system completely and relieve all pressure; never work on a pressurized tank
- Drain all hydraulic fluid using a transfer pump; remove residual fluid by unbolting the drain panel if needed
- Critical: Even trace amounts of hydraulic fluid near a weld are a fire and explosion hazard
OSHA 29 CFR 1910.252(a)(3)(i) prohibits welding or hot work on used tanks until they are thoroughly cleaned of all flammable materials and vapor-producing substances. All connecting pipelines must be disconnected or blanked before work begins.
OSHA 29 CFR 1910.252(a)(3)(ii) requires all hollow spaces and containers to be vented before preheating, cutting, or welding. Purge with inert gas before any hot work.
Petroleum-based hydraulic fluids (such as Shell Tellus S3 V 46 with a flash point of 210°C / 410°F) possess high flash points, but welding heat easily exceeds these thresholds, creating explosive atmospheres in unpurged tanks.
Cleaning requirements:
- Clean the tank interior and exterior thoroughly
- Remove all rust, oil residue, and paint from the repair area
- Contaminated surfaces cause epoxy delamination and weld porosity — prep quality directly determines repair longevity
- NFPA 326 outlines mandatory procedures for safeguarding tanks for entry, cleaning, or repair, including testing for oxygen content and flammable vapors
Step 2: Locate and Assess the Full Extent of Damage
Inspection process:
- Perform a thorough visual inspection of all weld seams, fittings, drain plugs, and tank walls
- Note that fluid always travels to the lowest point before pooling, so the visible leak source may not be the actual origin
- For corrosion pitting, use a flashlight and probe to check wall thickness—if widespread thinning is found, document it to inform the fix-vs-replace decision later
- Check for multiple failure points simultaneously, as tanks rarely have just one problem once corrosion or stress cracking begins
Ultrasonic testing (UT):
Professional contractors scan tank walls and bottoms using UT equipment to identify pinholes, minute permeations, and wall thinning that visual inspection misses entirely.
This non-destructive testing (NDT) method is essential for regulatory compliance and for making a defensible fix-vs-replace decision.
Step 3: Apply the Correct Repair Method
What the assessment reveals determines which repair method applies. Match the fix to the failure type — using the wrong method wastes time and guarantees a callback.
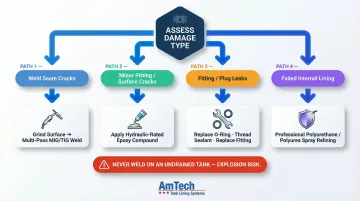
For weld seam cracks:
- Grind out the old weld to create a clean valley before applying any new material
- Apply a fresh MIG or TIG weld in multiple passes — typically 3 passes for full integrity restoration
- Never weld directly over a cracked weld without grinding first; it will fail again
- Per API 653, arrest fatigue cracks by drilling the tips, then gouge and apply full-penetration groove welds per AWS D1.1
For minor pitting or small surface cracks (non-weld areas):
A high-quality, hydraulic-rated epoxy compound or metal repair putty can be effective as a field repair:
- Belzona 1111 (Super Metal) — A two-component, machinable, silicon-steel reinforced epoxy that provides compressive strength up to 13,095 psi and resists mineral and lubricating oils
- J-B Weld TankWeld — A steel-reinforced epoxy putty that cures to a tensile strength of 4000 PSI and withstands temperatures up to 300°F
Prep the surface, apply per manufacturer instructions, and allow full cure time before refilling.
For fitting and drain plug leaks:
- Replace the O-ring, thread sealant, or fitting entirely—never reuse old seals with new hardware
- Check threads for damage and recut or install a thread insert (Time-Sert, Helicoil) if needed
- Use appropriate thread sealant like Loctite 567 for tapered threads
- PTFE tape is strictly prohibited on JIC or ORFS fittings as it does not seal the joint and introduces contamination
For tanks with failed or absent internal lining:
A professional protective relining system is the preferred long-term solution for tanks with widespread corrosion. Professional systems such as 100% solids polyurethane/polyurea spray-up linings (applied in 80 to 125 mil thickness) or cementitious lining systems seal corrosion, prevent future wall penetration, and restore the tank to serviceable condition without full replacement. These systems achieve adhesion strength up to 1965 PSI when substrate is properly prepared, creating a monolithic wall barrier with no seams or overlap areas.
Step 4: Reassemble, Refill, and Test
Reassembly:
- Reinstall all fittings, plugs, and access panels with new seals
- Torque to spec—avoid over-tightening, which can cause thread damage and create new leak points
Testing:
- Refill with fresh, clean hydraulic fluid and cycle the system at low pressure first
- Monitor all repaired areas for seepage before returning to full operating pressure
- Run the system under normal and peak operating conditions
- Check for recurrence over a defined observation period (recommend at least one full working shift)
When to Fix vs. Replace a Hydraulic Tank
The fix-vs-replace decision hinges on structural damage extent, repair cost relative to replacement, the tank's age and condition, and the operational risk of continued use. The criteria below clarify which way each scenario typically points.
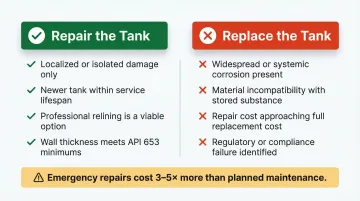
Repair the Tank When...
- The damage is localized—a single weld crack, a failed fitting, or a small patch of surface corrosion—and the overall tank structure remains sound
- The tank is relatively newer or recently inspected, and a professional repair will hold long-term
- A professional relining service can address internal corrosion and restore the tank's service life without the cost of fabricating or sourcing a new tank
- Wall thickness still meets API 653 minimums: 0.10 inches for bottoms without leak detection/containment, and 0.05 inches for designs with detection systems or reinforced linings applied
Replace the Tank When...
- Corrosion is widespread across multiple walls or weld seams, wall thickness has dropped below safe operating tolerances, or the tank has experienced repeated failures in a short timeframe
- The tank material is incompatible with the current fluid or operating environment and cannot be adequately addressed with a lining
- The cost of repair and downtime approaches or exceeds the cost of a replacement tank, particularly for smaller mobile equipment reservoirs
- OSHA or environmental regulations require current-standard compliance, and the existing tank cannot be brought up to spec
On cost: emergency hydraulic repairs run 3–5× more than planned maintenance. When structural integrity is still sound, professional relining preserves the original equipment design at a fraction of full replacement cost.
On compliance: 40 CFR 112 (SPCC) requires secondary containment for the full capacity of the largest single container, with sufficient freeboard for precipitation — and containment systems must prevent any discharge from escaping before cleanup occurs.
Common Mistakes to Avoid and Preventive Measures
Common Mistakes
Three errors account for the majority of failed hydraulic tank repairs:
- Welding on an undrained, uncleaned tank — Even trace fluid vapors are flammable. NFPA 51B requires a formal Hot Work Permit and a dedicated fire watch before any hot work begins.
- Using stop-leak additives as a permanent fix — These mask the symptom without addressing structural damage. Many are also incompatible with pump seals and valves, creating a second failure point downstream.
- Skipping the post-repair pressure test — A repair that looks clean visually can still fail under operating pressure. Always validate before returning the system to service.
With the most common failure points addressed, the next step is building a maintenance routine that prevents leaks from developing in the first place.
Preventive Measures
Implement scheduled visual inspections:
A structured inspection schedule catches problems before they become repairs. Recommended frequencies:
- Daily: Visual checks for fluid levels, fluid color/clarity, foam/aeration, and external leaks
- Monthly: Intensive service covering fluid analysis, filter replacement, and component inspection
Apply internal protective coatings:
Apply coatings during initial tank installation or during any major service interval to prevent corrosion from initiating inside the tank wall. Low VOC polysulfide epoxy coating systems provide superior adhesion, chemical resistance, and flexibility compared to older 3-coat epoxy systems, with an expected lifespan exceeding 50 years without failure.
Maintain fluid cleanliness and correct fluid levels:
Contaminated or low fluid accelerates internal corrosion and component wear, accelerating tank degradation that goes unnoticed until failure. Improving fluid cleanliness by just one ISO cleanliness code step can extend the life of pumps, valves, and bearings by 50% or more.
Filtering a system from ISO 22/20/18 down to 18/16/13 can result in a four times longer lifespan for sensitive components — a straightforward maintenance step with an outsized return.
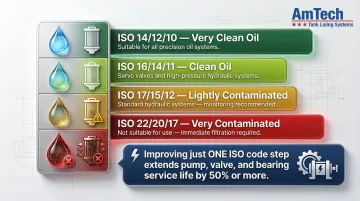
ISO 4406 Cleanliness Standards:
| ISO 4406 Code | Description | Suitable Application |
|---|---|---|
| 14/12/10 | Very clean oil | All oil systems |
| 16/14/11 | Clean oil | Servo & high-pressure hydraulics |
| 17/15/12 | Lightly contaminated | Standard hydraulic systems |
| 22/20/17 | Very contaminated | Not suitable for oil systems |
Frequently Asked Questions
Can I weld a hydraulic tank with fluid in it?
No—this is extremely dangerous. Hydraulic fluid vapors are flammable and can cause an explosion. The tank must be fully drained, cleaned, and decontaminated before any welding is attempted. OSHA 1910.252 strictly prohibits hot work on such containers until they are thoroughly cleaned and purged.
Does hydraulic stop leak actually work?
Hydraulic stop-leak additives are not a reliable or permanent repair for tank leaks. They may slow minor seepage at seals temporarily but will not address weld cracks, corrosion pitting, or structural damage. They can also damage pump seals or valves.
Can I repair metal without welding?
Yes. Hydraulic-rated epoxy compounds and metal repair putties can seal small surface cracks and pitting as a field repair, but weld repairs offer superior structural integrity for load-bearing seams and should be the standard for permanent fixes.
What are the most common causes of hydraulic tank leaks?
The top causes are weld seam fatigue/cracking, corrosion pitting from moisture or chemical exposure, failed O-rings and drain plug seals, and degraded or absent internal protective lining.
How long does a hydraulic tank repair typically last?
A properly executed weld repair or professional relining can restore decades of service life. A poorly prepared field repair — skipping surface grinding or using incompatible sealant — may fail within weeks. Quality of preparation and materials is the determining factor.