Pressure tank leaks follow predictable patterns. Most trace back to a handful of root causes: corroded fittings, faulty valves, internal corrosion, or bladder failure. The right repair approach depends entirely on where the leak originates and what caused it.
This guide covers the most common leak sources, a step-by-step repair process, when repair is viable versus replacement, and when to bring in a professional.
Key Takeaways
- Leaks typically originate from fittings, valves, welds, or the tank wall due to corrosion or bladder failure
- Minor fitting and valve leaks may be DIY-fixable — wall corrosion and internal liner failure require a professional
- Always isolate and depressurize the tank before inspection or repair
- Ignoring leaks risks pump damage, water hammer, flooding, and compliance violations
- Professional relining typically costs 20–40% of full tank replacement — and can add decades of service life
What Is a Pressure Tank?
A pressure tank is a sealed vessel that stores fluid under pressure. These tanks are used in well water systems, fire suppression, boiler feed water systems, chemical processing, and industrial fluid storage. The core function is maintaining system pressure between pump cycles, reducing pump starts and extending equipment life.
Two main types:
- Bladder/diaphragm tanks — Use a flexible butyl rubber bladder to separate air from water, preventing waterlogging and internal corrosion. Standard for residential and light-commercial well water systems
- Steel pressure vessels — ASME-coded construction rated for higher pressures and larger volumes. The standard for commercial, municipal, and industrial applications where duty cycles and stored media are more demanding
According to OSHA 29 CFR 1910.106 and ASME Section VIII, pressure vessels are defined as operating above 15 psig, requiring strict inspection and maintenance protocols.
Because these tanks operate under continuous mechanical stress, corrosion, pressure cycling fatigue, and chemical exposure all accelerate wear — which is why understanding how leaks develop, and how to address them, matters for anyone responsible for keeping a system online.
Common Causes of Pressure Tank Leaks
Most pressure tank leaks fall into four distinct categories. Correctly identifying where the leak originates is the first step to choosing the right fix.
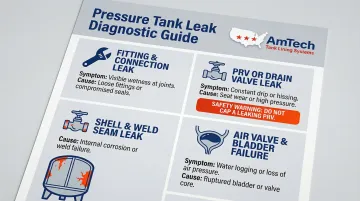
Leak at fittings, inlet/outlet connections, or pipe joints:
- Symptoms: Visible drips or wet rings around threaded or flanged connections
- Cause: Loose fittings, degraded thread sealant (pipe dope or PTFE tape), or minor corrosion at connection points
- Often the most straightforward to fix
Leak at the pressure relief valve (PRV) or drain valve:
- Symptoms: Water discharging from the PRV port or pooling under the valve
- Cause: Valve stuck open from debris, faulty valve seat, or genuine over-pressure conditions that triggered the valve as designed
- Critical: Never replace a PRV without diagnosing the root cause of over-pressure
Leak at the tank shell, weld seam, or base:
- Water seeping through the tank body, rust staining, or wet patches on the exterior shell
- Driven by internal corrosion (pitting, wall thinning from aggressive water chemistry), weld failure, or external mechanical damage
- Requires professional assessment — compromised wall thickness cannot be confirmed without ultrasonic testing
Leak at the air valve (bladder/diaphragm tanks only):
- Water spraying or trickling from the Schrader-type air valve signals a ruptured internal bladder
- Without bladder separation, the tank loses its hydraulic cushion entirely
- This is functional tank failure, not just a seal issue
Consequences of Ignoring Leaks
Pump damage: Waterlogged tanks cause pump short-cycling, generating inrush currents 10 to 20 times greater than full-load current, leading to motor overheating and premature failure.
Water hammer: Loss of the hydraulic cushion creates pressure transients that can generate forces equivalent to an 835-pound hammer slamming into a barrier, damaging piping and fittings.
Energy costs: Pumping systems account for nearly 20% of global electrical energy demand; frequent pump starts waste significant energy.
Regulatory exposure: Pressure vessel failures at industrial facilities can trigger OSHA citations under 29 CFR 1910.217, API 510 inspection non-compliance findings, and ANSI/ASME code violations — each carrying its own inspection, repair, and reporting obligations.
How to Repair a Leaking Pressure Tank (Step-by-Step)
Attempting repairs without first isolating the tank and identifying the root cause is both dangerous and ineffective. The correct repair path is entirely determined by what type of leak is present.
Step 1: Shut Down and Isolate the Tank Safely
- Turn off the well pump or system pump
- Close isolation valves on inlet and outlet lines
- Relieve system pressure by opening a downstream faucet or drain valve until the pressure gauge reads zero
- For industrial vessels: Follow OSHA 29 CFR 1910.147 lockout/tagout (LOTO) procedures
Never attempt repairs on a pressurized tank. Verify the tank is fully depressurized before touching any fitting, valve, or connection.
Step 2: Locate and Classify the Leak
- Dry the exterior of the tank thoroughly with a cloth
- Slowly restore pressure while watching carefully
- Use soapy water or spray foam at connection points, valve bodies, and weld seams to pinpoint the exact leak source
- Classify the leak as: (a) fitting/connection leak, (b) valve leak, (c) shell/seam/wall leak, or (d) air valve leak
Each requires a different repair approach.
Step 3: Apply the Correct Repair Based on Leak Type
Fitting or Connection Leaks
- Depressurize fully
- Disassemble the fitting
- Clean threads thoroughly
- Apply fresh PTFE tape (2-4 wraps) or NSF/ANSI 61 certified pipe joint compound
- Reassemble to correct torque — do not overtighten, as this can crack fittings or strip threads
PRV or Drain Valve Leaks
- If the PRV is discharging due to debris, clean or replace the valve
- If system pressure genuinely exceeds the valve's set point, investigate the root cause (faulty pressure switch, waterlogged tank) before replacing the valve
- Safety risk: Replacing the PRV without addressing over-pressure can lead to catastrophic vessel rupture
Shell Wall Corrosion, Pitting, or Weld Seam Leaks
Minor surface pitting on accessible areas can be temporarily sealed with epoxy putty compounds. Clean the surface thoroughly and cure per manufacturer instructions.
Epoxy compounds are strictly temporary — not permanent fixes for pressurized vessels. For tanks with significant wall thinning, internal corrosion, or recurring leaks, professional tank lining is the appropriate long-term solution. AmTech Tank Lining & Repair applies engineered lining systems (cementitious, polymer, or fiberglass) that restore structural integrity and provide decades of additional service life at a fraction of replacement cost.
Air Valve Leaks (Bladder Failure)
- A ruptured bladder cannot be repaired and is not a replaceable component in most bladder tanks
- Confirm bladder failure by checking the air valve: if water flows out when the valve core is depressed, the bladder has failed
- The entire tank must be replaced

Step 4: Test and Validate the Repair
- Slowly re-pressurize the system
- Monitor the pressure gauge for stability
- Re-inspect all repair points under full operating pressure for at least 15-30 minutes
- Confirm pump cycling returns to normal — pump activates at cut-on pressure, shuts off at cut-off pressure, and does not short-cycle
- Check that no new moisture appears at previously dry areas of the tank
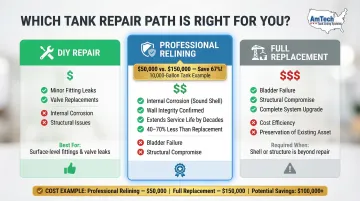
When to Fix vs Replace a Leaking Pressure Tank
This is a cost-versus-risk decision. A minor fitting repair costs almost nothing, while full tank replacement can run into tens of thousands of dollars for industrial vessels. But attempting to patch a structurally compromised tank creates liability and safety exposure.
Fix the tank when:
- The leak is isolated to a fitting, valve, or connection
- The tank shell is structurally sound with no wall thinning or widespread corrosion
- The bladder is intact (for bladder tanks)
Consider professional relining when:
- The tank has internal corrosion, pitting, or scaling but the shell still has structural integrity
- Wall thickness readings (via ultrasonic testing) confirm adequate remaining metal
- Leaks are traced to lining failure or coating breakdown rather than base metal fracture
- The tank geometry and access points are suitable for field-applied lining systems
Relining is often 40–70% less expensive than full replacement. A 10,000-gallon carbon steel tank that costs $150,000 to replace might be relined for approximately $50,000 — with engineered lining systems that extend service life by decades. API 579-1/ASME FFS-1 Fitness-For-Service evaluations can confirm structural adequacy and satisfy insurer or regulatory requirements before work begins.
If you're unsure which path applies to your tank, a qualified inspector can assess wall condition, identify failure mode, and recommend the most cost-effective approach.