Leaks are common across the lifespan of both aboveground storage tanks (ASTs) and underground storage tanks (USTs) due to corrosion, aging components, and maintenance gaps. The historical average lifespan of a steel UST is approximately 20 years, and EPA investigations found moderate to severe corrosion in 83% of inspected diesel USTs.
This guide covers how to identify a leak, diagnose its source, choose the right repair approach—component fix, professional relining, or full replacement—and prevent future failures.
Key Takeaways
- Most oil tank leaks trace back to corroded bottoms or seams, failed fittings, degraded supply line connections, or structural fatigue
- Minor fitting and valve leaks can sometimes be resolved by replacing the defective component; tank body or structural leaks require professional relining or full replacement
- Aboveground leak response starts with safety: ventilate the area, shut off the supply, and remove ignition sources before anything else
- Underground tank leaks frequently go undetected for years and almost always involve soil contamination requiring regulatory reporting
- Early detection and scheduled inspections are the most cost-effective way to avoid major repair and remediation costs
How to Identify an Oil Tank Leak
Signs of a Leak in Aboveground and Indoor Tanks
Aboveground and indoor tanks give several early warning signs before a leak becomes a visible pool:
- Oil staining, wet spots, or puddles beneath the tank
- Oil film or discoloration near seams, fittings, or at the tank base
- Strong, persistent fuel oil odors indoors (fuel evaporates faster than it drips, making smell an earlier warning than pooling)
- Unexplained drops in fuel level between scheduled deliveries
- Fuel consumption rising without corresponding usage increases
Even a slow seep can go unnoticed for months.
A single pinhole-sized leak can lose 400 gallons of fuel per year, illustrating why "small" leaks matter. Any unexplained consumption change warrants immediate investigation.
Signs of a Leak in Underground and Outdoor Tanks
Detection indicators for buried tanks include:
- Oil sheen on sump pump water
- Contaminated well or neighboring water supply
- Dead or discolored vegetation directly above the buried tank area
- Strong oil smell when excavating nearby soil
Underground leaks are often silent for years — by the time surface signs appear, contamination is already spreading. A 2022 EPA study found that sites requiring remedial action had an average cleanup duration of 1,842 days (over 5 years) in Kansas and Virginia, and nearly 17 years in South Carolina. Scheduled soil testing and groundwater monitoring are the only reliable way to catch these leaks before cleanup costs spiral.
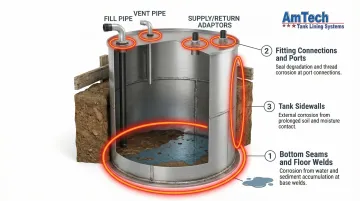
Where Oil Tanks Most Commonly Leak
The most common leak locations include:
- Bottom seams and floor welds — where sludge and water accumulate and accelerate corrosion from the inside
- Fitting connections and ports — fill pipe, vent pipe, supply and return line adaptors
- Tank sidewalls — where they contact wood, soil, or other corrosive surfaces
What Causes Oil Tank Leaks?
Oil tank leaks share a short list of root causes. Understanding which one you're dealing with determines whether repair is viable — or whether replacement is the only defensible option.
Internal Corrosion (Water & Sludge)
Water enters tanks through condensation and fuel delivery, settles at the bottom, and corrodes steel from the inside out. Microbially influenced corrosion (MIC) worsens this process — EPA investigations found that 90% of fuel samples contained ethanol and microbial acids that produce deep pitting corrosion at the fuel/water interface. This is the leading cause of structural tank failures and the hardest to detect early.
External Corrosion
Underground and outdoor tanks face corrosion from soil moisture, electrochemical reactions between dissimilar metals, and ground movement. These forces work slowly but continuously on unprotected steel exteriors.
Fitting, Gasket & Connection Failures
Temperature cycling causes fittings to expand and contract over years, gradually loosening connections. Degraded rubber gaskets, cracked flare connections, and improperly sealed thread joints account for a significant share of observable seepage — and unlike structural failures, these are often repairable.
Age, Overloading & Operational Damage
Steel USTs carry an industry-standard service life of roughly 20 years, after which material degradation speeds up. A tank past its design lifespan rarely fails at just one point — broad deterioration is typically already underway. Physical impact, overfill events (which account for 22% of tank-source releases in New York), and improper support conditions hasten that failure.
How to Repair an Oil Tank Leak: Step-by-Step
The correct repair approach depends entirely on where the leak originates. A fitting failure and a corroded tank bottom require fundamentally different responses. Proceeding without confirming the source wastes time, costs money, and creates safety and liability risks.
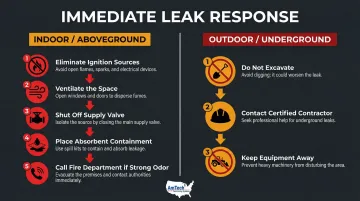
Step 1: Prioritize Safety and Contain the Leak
For indoor or aboveground leaks:
- Immediately eliminate ignition sources
- Ventilate the space
- Shut off the tank supply valve
- Place absorbent containment material around the leak
- Call the fire department if oil odor is strong
OSHA sets the permissible exposure limit for airborne benzene at 1 ppm as an 8-hour time-weighted average, with a short-term limit of 5 ppm over 15 minutes. Oil vapor exposure causes headaches, dizziness, and nausea—move family or personnel away from the area immediately.
For outdoor or underground leaks:
- Do not excavate or disturb the tank
- Engage a certified contractor immediately
- Avoid using vehicles or equipment near the suspected leak zone
Step 2: Locate and Confirm the Exact Leak Source
Inspect all external components first: fittings, valves, fill pipe adaptor, vent cap, and supply/return line connections. Most visible leaks originate at these connection points rather than the tank body, and confirming this distinction determines the entire repair path.
Examine the tank body for wet spots, oil staining at seams, rust scaling, soft metal spots, or corrosion at the base and bottom welds. For USTs, certified contractor methods are required to confirm leak location reliably: low-pressure testing, electronic scanning, ultrasonic testing, and soil sampling. DIY probing of a buried tank is not recommended.
Step 3: Apply the Right Repair Based on Leak Source
If the Leak Is at a Fitting, Valve, or Supply Line
Follow this process for fitting/valve replacement:
- Pump out oil to safe working level
- Remove and replace the defective component (valve, gasket, flare fitting, vent cap)
- Use the correct thread sealant for fuel line applications
Critical: OEM manuals explicitly prohibit using PTFE (Teflon) tape on fuel oil fittings. Tape fragments can lodge in fuel line components and damage equipment. Use only UL-classified, oil-resistant, non-hardening pipe sealant compounds suitable for petroleum applications.
For damaged copper or flexible supply lines (crimped, cut, or corroded from external contact), replacement of the affected line segment is straightforward and durable. Copper lines resist oil-related corrosion but can fail from physical damage or at junction fittings.
If the Leak Is in the Tank Body
Pinhole leaks, weeping seams, or corroded bottom areas cannot be safely or durably patched. A visible weep is a symptom of broader metal degradation in the surrounding wall, and surface patches fail. This finding redirects the repair decision to one of two paths: relining or full replacement.
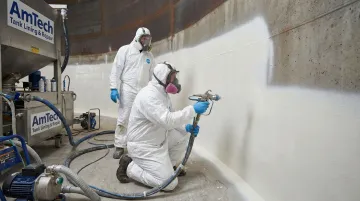
Where the structural shell remains intact, professional tank relining is the appropriate repair — it avoids full replacement cost while restoring compliance. AmTech Tank Lining & Repair's Armor Shield and DuraChem 500 series lining systems meet ANSI, API, NSF, and UL standards, with field-applied polyurea and polyurethane systems that bond directly to steel or concrete.
Key performance specs for AmTech's relining systems:
- Applied at 80–125 mils thickness via high-temperature, high-pressure spray-up
- Adhesion strength up to 1,965 PSI
- Instant-cure formulation — systems return to service within minutes
- Eliminates internal corrosion pathways and extends service life by decades
Step 4: Test, Document, and Report
After any repair, conduct a pressure or leak integrity test before returning the tank to service. Document all repair work including materials, dates, and test results — this creates a compliance record and supports future inspection decisions.
For outdoor or underground leaks, federal regulations require site assessment and measurement for releases before closure or change-in-service. Most states require environmental agency reporting once contamination is confirmed. A qualified contractor handles filing the required documentation — including No Further Action letters — protecting the owner from future liability.
Fix, Reline, or Replace Your Oil Tank?
The right decision hinges on the leak source, tank age, structural integrity, extent of contamination, and total cost over a 10–15 year horizon — not just the lowest immediate cost. Think of this as a risk and lifecycle analysis, not a line-item budget decision.
Fix (Component Repair)
The right call when the problem is isolated — a single fitting, valve, vent cap, or supply line — and the tank itself is structurally sound. Key qualifying conditions:
- Tank is under 20 years old with no body corrosion
- Wall and seam inspection confirms structural integrity
- Leak source is definitively isolated to one component
Component repairs typically run hundreds to low thousands of dollars, compared to tens of thousands for full replacement.
Reline
The preferred path when internal corrosion has compromised the tank's interior surface but the structural shell remains sound. Relining avoids excavation and demolition, minimizes facility downtime, and can add decades of reliable service life at a fraction of replacement cost.
Our inspections confirm that 98% of double-walled tanks are structurally sound enough to return to full service life after relining. With ANSI, API, and UL-listed lining systems and field crews across all 50 states, we've performed this work for industrial, commercial, and municipal operators for over 55 years.
Replace
Necessary when the tank has exceeded its design lifespan (typically 20–25 years for steel ASTs; often mandated for aged USTs), has multiple breach points, or shows through-wall corrosion that makes structural integrity questionable. State regulations may also mandate removal of aged USTs regardless of condition.
Always engage a certified inspector to assess structural integrity before committing to fix or reline. Applying either approach to a tank past end of life creates safety risk, regulatory violations, and liability far exceeding the cost of replacement.
How to Prevent Future Oil Tank Leaks
Set and Follow a Routine Inspection Schedule
Check fittings, seams, vent components, supply lines, tank exterior, and base/support condition on a regular schedule. API 653 requires aboveground storage tanks to undergo their first formal internal inspection 10 years after construction, with subsequent inspections normally every 20 years. EPA regulations mandate 30-day walkthroughs and annual inspections covering spill prevention equipment and release detection systems.
Scheduled inspections catch fitting failures and early corrosion well before they become structural problems.
Control Water Accumulation and Sludge
Periodically drain water from the tank bottom — this is especially critical for outdoor and buried tanks. Monitor fuel deliveries for signs of water contamination. Removing water consistently is the single most effective way to slow internal corrosion.
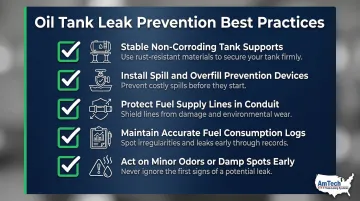
Apply Sound Operational and Installation Practices
Beyond inspection and water management, the way a tank is installed and operated directly affects how long it lasts. These safeguards reduce leak risk at the source:
- Mount tanks on stable, non-corroding supports — never direct wood or soil contact
- Install spill and overfill prevention devices on all ASTs
- Protect fuel supply lines in conduit or route them under concrete
- Keep accurate fuel consumption logs to spot anomalous usage early
- Act on minor odors or small damp spots — don't wait for visible pooling
Early intervention consistently costs less than full remediation. A failed fitting caught during a routine walkthrough might run a few hundred dollars to fix. The same issue ignored until it causes soil contamination or structural failure can escalate into a six-figure cleanup. Knowing when a component repair is enough — versus when a tank has reached end of life — is how facility managers avoid the bigger bill.
Frequently Asked Questions
Can a leaking oil tank be repaired?
It depends on the leak source. Fitting, valve, and supply line leaks can often be resolved by replacing the affected component. Tank body leaks cannot be durably patched and instead require professional relining (if structurally viable) or full replacement.
Where are the most common places for an oil tank to leak?
The three most common failure points are:
- Bottom seams and floor welds, where water and sludge drive internal corrosion
- Fittings and connection ports (fill, vent, supply/return lines)
- Corroded sidewalls where tanks contact wood, soil, or other corrosive surfaces
What should I do if my home oil tank is leaking?
Shut off the supply valve immediately, ventilate the area and call the fire department if indoors, contain the spill with absorbent materials, and contact a certified contractor. Do not attempt to patch a tank body leak yourself.
How much does it cost to repair or replace a leaking oil tank?
Fitting and component repairs typically run hundreds to low thousands of dollars. Professional tank relining costs significantly less than full replacement. Full replacement plus soil remediation for underground leaks can reach $88,000 to over $300,000 — get contractor quotes for your specific situation.
Does homeowners insurance cover oil tank leaks?
Coverage varies widely. New Jersey and New York insurance regulators note that many standard policies exclude pollution liability, though some insurers offer optional buy-back coverage. Review your policy and contact your insurer immediately after a leak.
How long does oil tank repair or relining take?
Fitting repairs are typically completed in hours. Professional tank relining generally takes one to several days depending on tank size and lining system. Full tank removal and replacement timelines vary based on tank type (AST vs. UST), site conditions, and contractor availability.