Introduction
Underground water tanks store potable water, fire suppression reserves, and process water under constant hydrostatic and soil pressure — and because they operate out of sight, leaks rarely announce themselves early. By the time a problem surfaces, it has often already caused measurable water loss, structural damage, or a regulatory violation.
The risk is most severe in aging tanks. Concrete develops stress fractures, steel corrodes from the inside out, and interior waterproofing coatings degrade over time.
This guide covers the complete repair process:
- Recognizing early warning signs before damage escalates
- Identifying root causes by tank material (concrete, steel, fiberglass)
- Executing the correct repair method for each failure type
- Deciding when relining or full replacement makes more sense
- Knowing when professional involvement is required
Key Takeaways
- Leaks stem from structural cracks, joint failures, corrosion, or degraded interior linings
- Early signs include unexplained water level drops, surface dampness, and reduced system pressure
- Repair methods differ by material: concrete, steel, and fiberglass each require specialized approaches
- Most underground repairs require licensed professionals due to confined space hazards and compliance requirements
- When damage is extensive, relining or full replacement is usually more cost-effective than repeated patching
What Is an Underground Water Tank and Why Do Leaks Develop?
Underground water tanks are below-grade storage vessels used where surface space is constrained, freeze protection is a priority, or security from tampering is required. Built primarily from concrete, coated steel, or fiberglass, these tanks store potable water, fire suppression water, and process water in municipal, commercial, and industrial settings.
Leaks develop as tanks age through predictable failure patterns:
- Concrete tanks become porous and crack under hydrostatic and soil pressure
- Steel tanks corrode internally from electrochemical reactions with stored water
- Interior waterproofing coatings degrade past their service life
- Pipe penetration joints and construction seams gradually lose their seal
Underground tanks are particularly difficult to monitor because damage remains invisible until it causes measurable water loss or structural deterioration. According to the EPA, the U.S. national average for "unaccounted for" water in community systems is 8.4%, with real losses largely attributed to infrastructure leakage.
Common Signs and Causes of Underground Water Tank Leaks
Most underground tank leaks follow predictable failure patterns. Material type, installation quality, age, and maintenance history each determine how and where a tank begins to fail.
Structural Cracks in Tank Walls or Floor
Symptoms:
- Unexplained reduction in stored water volume
- Wet soil or surface pooling above the tank area
- Visible efflorescence (white mineral deposits) on concrete exterior walls if accessible
Likely cause: Hydrostatic pressure from surrounding soil, ground movement, freeze-thaw cycles, and traffic vibration all create stress fractures in concrete or weld seams in steel tanks. ACI 224.1R — a recognized industry standard for concrete cracking — attributes these failures to drying shrinkage, thermal stress, chemical reactions, and differential settlement.
Failed Joints, Seams, or Pipe Penetrations
Symptoms:
- Leaks concentrated near inlet/outlet pipes, access hatches, or overflow connections
- Rust staining or moisture near fittings
- Reduced flow or pressure drop at connected systems
Likely cause: Poor original installation, missing waterstop material, corrosion around metal fittings, or differential movement between pipe and tank wall can all shear a joint seal. Concrete tanks typically require re-sealing between 30 and 50 years — meaning many tanks currently in service are already overdue for assessment.
Corrosion or Material Degradation
Symptoms:
- Discolored or rust-tinged water (in steel tanks)
- Visible pitting, flaking, or soft spots on interior surfaces during inspection
- Accelerated water loss without obvious crack locations
Likely cause: Electrochemical corrosion degrades unlined or poorly lined steel tanks, while alkaline or acidic water chemistry attacks the concrete matrix over time. A less visible threat is microbiologically influenced corrosion (MIC) — sulfate-reducing bacteria produce hydrogen sulfide and iron sulfides that create deep localized pitting beneath biofilms, often undetected until significant damage has occurred.
Failed Interior Waterproofing or Lining
Symptoms:
- Gradual, diffuse water loss rather than single concentrated leak point
- Widespread dampness on exterior walls
- Reduced water quality or contamination concerns
Likely cause: Waterproofing coatings applied without proper surface preparation; incompatible coating materials; coating aged beyond service life (thin-film epoxy linings typically last 8-15 years); or a lining not rated for potable water or the specific chemical content of the stored liquid.
Consequences of ignoring these issues: Escalating structural damage, contaminated water supply (undetected leaks have contributed to documented disease outbreaks — including a Salmonella outbreak in Gideon, MO that caused 600 illnesses and seven deaths), regulatory non-compliance, and far higher repair or replacement costs as problems compound.
How to Repair an Underground Water Tank Leak — Step by Step
Attempting to repair an underground tank without confirming the exact location and root cause typically results in failed patches, repeat failures, and wasted cost. Correct diagnosis drives every repair decision that follows.
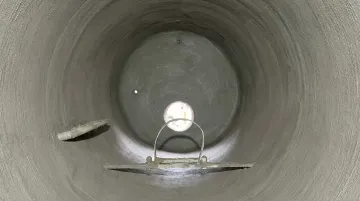
Step 1: Inspect and Detect the Leak Source
Drain the tank to the lowest safe level (or fully) and conduct a visual interior inspection under adequate lighting. Look for visible cracks, spalling concrete, rust streaks, joint separation, and wet areas. Document all findings with photographs before any surface cleaning.
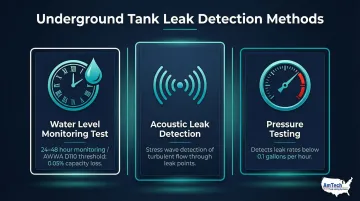
For leaks not visible on the interior surface, use:
- Water level monitoring test — mark the water level and record drop over 24-48 hours. AWWA D110 mandates that water-level drop must not exceed 0.05% of tank capacity over 24 hours.
- Acoustic leak detection — uses stress waves generated by turbulent liquid flow through leaks to locate failure points
- Pressure testing — validates internal leakage by monitoring pressure drops over time; highly accurate for detecting leak rates below 0.1 gallons per hour
CRITICAL: Confined space entry into underground tanks requires compliance with OSHA 29 CFR 1910.146, including:
- Atmospheric testing for oxygen content (19.5%-23.5%), flammable gases/vapors, and toxic air contaminants
- Continuous forced air ventilation from a clean source
- At least one trained attendant stationed outside the permit space
- Appropriate PPE and retrieval systems (chest/full-body harness, retrieval line)
Step 2: Identify the Root Cause by Tank Type and Condition
Determine the tank material (concrete, coated steel, fiberglass) and review the tank's age, installation records, and maintenance history. A crack in a 10-year-old concrete tank points to a different cause (and repair approach) than corrosion pitting in a 40-year-old steel tank with a failed coating.
Before proceeding, rule out external factors: nearby construction, soil subsidence, or heavy vehicle loads above the tank can apply ongoing stress that will re-open any repair. Fixing the surface without addressing the root mechanical cause leads to repeat failure.
Step 3: Select and Apply the Right Repair Method
For Concrete Tanks with Isolated Cracks or Joint Failures
Epoxy injection is the correct method for dormant (non-moving) cracks where structural restoration is needed. The epoxy fills the void and cures under pressure, rebonding the crack faces. Requires dry or Saturated Surface Dry (SSD) conditions for optimal bond.
Polyurethane injection is required for active water leaks and moving cracks. Hydrophobic/hydrophilic foam expansion blocks water flow and accommodates slight movement, though it provides lower bond strength than epoxy.
For dormant cracks, cementitious repair mortars or hydraulic cement can be applied to the prepared crack face after grinding, cleaning, and removing all loose material. Surface preparation is as important as the repair material itself.
For Steel Tanks with Corrosion or Coating Failure
Abrasive blasting to bare metal is required before any new coating can be applied. Surface preparation must meet SSPC/AMPP standards:
- SSPC-SP 5 (White Metal Blast): 0% loosely or tightly adhering material; 0% stains permitted
- SSPC-SP 10 (Near-White Metal Blast): 0% adhering material; stains limited to 5% of surface area
- SSPC-SP 6 (Commercial Blast): 0% adhering material; stains limited to 33% of surface area
Spot-welded patches can address isolated holes or perforations. SSPC/AMPP guidelines recommend:
- Localized patching when coating failure affects <2% of surface area
- Full interior relining when 25% or more of coating has failed
For widespread corrosion, a full interior lining system is more effective than repeated localized patching. AmTech Tank Lining & Repair's DuraChem 500 series poly lining systems and HydraStone Alkrete cementitious lining systems are designed for this application, with NSF-compliant options across both product lines.
For Failed Interior Waterproofing or Lining Systems
Full interior relining is the appropriate response when coating failure affects a significant surface area. Professional-grade lining systems include:
- 100% solids polyurea/polyurethane coatings (practical service life: 17-20 years for medium-film systems)
- Cementitious linings (compatible with wet concrete substrates)
For tanks storing potable water, any lining material must be NSF/ANSI 61 certified. This standard establishes minimum health effects requirements for chemical contaminants imparted from barrier materials to drinking water.
For Joint and Pipe Penetration Failures
Remove all deteriorated sealant or joint filler and clean the joint face before applying any repair material. Repair options by condition:
- Apply a flexible, waterproof joint compound rated for the stored liquid at joint faces
- Use mechanical link seals for pipe penetrations with defined gap dimensions
- Use chemical grouting where gap size or geometry precludes mechanical seals
- Never substitute standard construction caulk or non-rated sealants in water tank applications
Step 4: Test and Validate the Repair
After repair materials have fully cured per manufacturer-specified times, refill the tank in stages and monitor for recurrence at the repaired locations. Run a water level test over 48-72 hours before returning the tank to full service.
For potable water tanks, perform a disinfection protocol per AWWA standards and collect water quality samples before returning the system to service. Document the repair, materials used, cure times, and test results for regulatory compliance and future maintenance records.
When Should You Repair vs. Replace an Underground Water Tank?
Four factors drive the repair-vs-replace decision: extent of damage, remaining service life, cost differential, and regulatory compliance requirements for the stored liquid.
Repair or reline when:
- The tank structure is fundamentally sound but has localized cracks, joint failures, or a failed interior lining
- The tank is within its expected service life
- The cost of relining is substantially less than full replacement — relining typically costs less than half of full replacement while delivering decades of additional service life
Professional relining extends a tank's service life without the disruption and expense of excavation and reconstruction. A properly installed fiberglass reline lasts 20-30 years, while high-performance epoxy linings deliver 15-20+ years of additional service before full rehabilitation is needed.

Replace when:
- There is widespread structural failure (multiple large cracks, wall spalling, severe corrosion throughout)
- The tank is well beyond its design life and repeated repairs have failed to hold
- The tank cannot be upgraded to meet current NSF, AWWA, or local code requirements for the stored liquid
- A site assessment determines that ground conditions are causing ongoing damage that any repair will not survive
Regulatory standards also set hard thresholds that force the decision. Know these before committing to a repair scope:
Regulatory triggers:
- AWWA D110 dictates that if net liquid loss exceeds the 0.05% allowable threshold, the tank must be repaired, re-disinfected, and retested
- Per API 1631 (referenced in EPA 40 CFR 280.33), if an internal lining is the sole method of corrosion protection and more than 5% of the lining surface area is damaged or degraded, the lining cannot be repaired, and the tank must be permanently closed
Common Mistakes to Avoid and How to Prevent Future Leaks
Repairs fail most often because of four recurring mistakes:
- Patching surface cracks without identifying the root cause — soil pressure, ongoing settlement, or joint failure
- Using coating materials not rated for potable water or the stored liquid's chemistry
- Skipping surface preparation before applying epoxy or lining materials, which causes delamination and early failure
- Refilling the tank before repair materials have fully cured
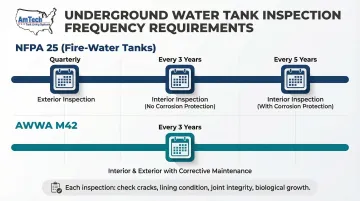
A defined inspection schedule is your first line of defense against unplanned failures. Industry standards set the baseline:
- NFPA 25 (fire-water tanks): Interior without corrosion protection every 3 years; with corrosion protection every 5 years; exterior quarterly
- AWWA M42: Interior and exterior inspection with corrective maintenance at three-year intervals
Each inspection should check for crack initiation, lining condition, joint integrity, and biological growth. Log all findings, repairs completed, and water quality test results — this record becomes critical when evaluating repair scope and demonstrating regulatory compliance.
Beyond inspections, a few operational habits prevent structural damage from building unnoticed:
- Avoid placing heavy loads or vehicles above the tank footprint
- Ensure proper drainage around the tank perimeter to reduce hydrostatic pressure
- Monitor inlet/outlet connections for vibration damage
- Schedule recoating before the existing lining fails completely. Proactive relining typically costs a fraction of emergency repair on a structurally compromised tank.
That last point is backed by data. A U.S. Navy study found that combining cathodic protection with interior coatings mitigates corrosion at pinholes and can double or triple the interval between required recoatings — a direct argument for staying ahead of the maintenance curve rather than reacting to failure.
Conclusion
Most underground water tank leaks are identifiable and fixable if caught early. The key is regular inspection, correct root cause diagnosis, and using repair materials rated for the tank type and stored liquid.
Once a leak is confirmed, the right path — repair, relining, or replacement — depends on several factors:
- Structural condition and extent of degradation
- Remaining service life and compliance requirements
- Tank type and stored liquid (potable water, fuel, chemicals)
- NSF/ANSI 61 certification requirements for potable water systems
For commercial, municipal, and industrial tanks, qualified contractor involvement is essential to a long-lasting, code-compliant outcome. Confined space entry protocols, surface preparation standards, and material certification requirements demand specialized knowledge and equipment that general contractors typically don't carry.
AmTech Tank Lining & Repair has handled underground tank restorations across all these applications for 55+ years — from potable water relining under NSF/ANSI 61 to fuel tank compliance conversions — with engineer-led field crews operating across all 50 states.
Frequently Asked Questions
Who is responsible for an underground water leak?
Responsibility follows the leak's location: property owners and facility operators are responsible for leaks from their storage tank or private water system; municipal utilities own leaks in public water mains. EPA LUST regulations may also assign specific reporting obligations to the tank owner or operator.
How do you detect a leak in an underground water tank?
Monitor for unexplained drops in water level over 24–48 hours, then check for surface pooling or saturated soil above the tank. Start by monitoring for unexplained water level drops over 24–48 hours and checking for surface pooling or saturated soil above the tank. Interior visual inspection (following confined space protocols) and pressure testing or acoustic detection equipment confirm leaks that aren't visually apparent.
Can a concrete underground water tank be repaired without full replacement?
Yes. Concrete tanks with isolated cracks, joint failures, or degraded waterproofing can be repaired using epoxy or polyurethane injection, cementitious repair mortars, or full interior relining systems. Replacement is only necessary when structural integrity is broadly compromised.
What are the signs that an underground water tank is leaking?
Common indicators include unexplained reduction in stored water volume, wet or saturated soil above the tank, reduced water pressure in connected systems, discolored water (in steel tanks), and visible efflorescence or moisture staining on accessible exterior walls.
How long does an underground water tank lining last?
Service life depends on the lining material, stored liquid, and maintenance history:
- Thin-film epoxy: 8–15 years
- Medium-film/ultra-high solids epoxy: 17–20 years
- FRP/polyurethane: 10–20 years
A properly applied, NSF-compliant lining inspected on schedule can deliver decades of service.
When should an underground water tank be replaced instead of repaired?
Replacement makes more sense than repair when:
- Structural failure is widespread and beyond economical repair
- The tank has exceeded its design life with multiple failed repair attempts
- It cannot meet current NSF/AWWA/code requirements after repair
- Ground conditions (settlement, soil pressure) will continue defeating repairs