Introduction
Welding a steel diesel fuel tank ranks among the most hazardous repair jobs in industrial and fleet maintenance. The combination of residual fuel vapors and open arc welding creates a serious explosion risk that has resulted in multiple documented fatalities. According to OSHA accident reports, welders have died from tank explosions even after performing initial purging—one incident involved a welder who purged the tank once, tested it, found a pinhole, and struck an arc without purging a second time, resulting in a fatal explosion.
That risk exists even with diesel, which has a higher flash point than gasoline (>38°C/100°F) and is classified as a Class II combustible liquid. Welding heat still vaporizes residual fuel fast enough to create an explosive atmosphere inside the tank.
The repair process is achievable — but outcomes depend heavily on four variables:
- How thoroughly the tank is cleaned and degassed
- Which welding method is selected
- How precisely weld parameters are controlled
- How rigorously the finished weld is tested
This guide walks through each of those factors in detail — including the mistakes that cause weld failures and the conditions under which welding alone won't restore a tank's long-term integrity.
Key Takeaways
- Verify complete fuel removal, chemical degassing, and vapor-free conditions with an LEL meter before striking any arc
- MIG welding with ER70S-6 wire is preferred for mild steel diesel tanks; TIG is used for thin-gauge precision repairs
- Skipping degassing and cleaning steps — not the welding technique — causes most dangerous failures
- Post-weld pressure testing at 3–5 PSI with soapy water is required before the tank returns to service
- Widespread corrosion or multiple leak points call for professional tank repair and interior lining for durable, code-compliant results
How to Weld a Steel Diesel Fuel Tank: Step-by-Step
Step 1: Disconnect, Drain, and Remove the Tank
Before any other action, disconnect all electrical power to the vehicle or equipment—battery disconnected, ignition off—to eliminate ignition sources. Even though diesel has a higher flash point than gasoline, welding heat vaporizes residual fuel and creates ignitable vapor at elevated temperatures. OSHA 29 CFR 1910.252 explicitly prohibits welding in the presence of explosive atmospheres that may develop inside improperly prepared tanks.
Drain all remaining fuel into an approved flammable-liquid container. Never perform this near open flames, inspection pits, or drains. Diesel fuel disposal must comply with EPA 40 CFR 279 regulations for used oil management—containers must be in good condition, not leaking, and clearly labeled "Used Oil."
Physically remove the tank from the vehicle or structure safely. Wear chemical-resistant gloves and ensure proper ventilation throughout. Removal gives full access to all surfaces and allows proper post-weld pressure testing that is difficult or impossible to perform in situ.
Step 2: Clean the Tank Thoroughly with Hot Water and Detergent
Fill the tank with hot, soapy water, agitate thoroughly, and drain into an approved container. Repeat multiple times until wash water runs clear and interior smell is minimal. Residual diesel coats interior surfaces and continues to off-gas hydrocarbons even after draining — soap breaks down the fuel film and reduces vapor production before the degassing step.
According to OSHA 29 CFR 1910.252(a)(3)(i), no welding shall be performed on used containers until they have been cleaned so thoroughly as to make absolutely certain that there are no flammable materials present or any substances that might produce flammable or toxic vapors when subjected to heat.
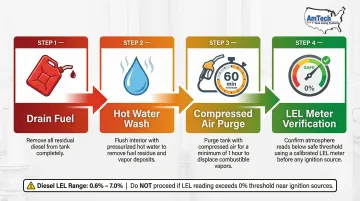
Step 3: Purge All Fuel Vapors from the Tank
Use compressed air or an inert gas purge to evacuate the tank for a minimum of one hour through all openings. The goal is to displace all hydrocarbon vapor from the interior atmosphere. OSHA 29 CFR 1910.252(a)(3)(ii) requires all hollow spaces to be vented to permit escape of air or gases before welding, and recommends purging with inert gas.
Use a combustible gas detector (LEL meter) to verify that residual vapor levels are at or below the safe threshold. Diesel fuel has a Lower Explosive Limit (LEL) of 0.6% and an Upper Explosive Limit (UEL) between 4.7%–7.0%.
OSHA Safety and Health Information Bulletin 09-30-2013 requires that LEL meters be calibrated using certified traceable test gas before each use — the instrument can only be as accurate as the test gas used for calibration.
The sense of smell alone is not reliable. A calibrated instrument test is the only professional-grade confirmation of a safe atmosphere. NFPA 326 requires tests for flammable vapors to be made with an appropriate instrument before and during any hot work operations.
Beyond instrument verification, some welders use a water-fill method as a supplemental safeguard for in-situ repairs — filling the tank completely so only the weld area is exposed to air. NFPA 326 and OSHA guidance both note that this approach has limitations: vapors can still concentrate in the roof space or volatilize from fuel residues above the waterline, so it does not replace gas testing.
Step 4: Inspect Damage and Prepare the Weld Surface
Identify the full extent of damage using visual inspection combined with pressure testing. Apply low-pressure air (3–5 PSI maximum) with soapy water externally to locate all cracks, pinholes, and seam failures before setting up equipment.
Prepare the surface by grinding or wire-brushing the weld area to bare, clean metal. Remove all rust, scale, paint, and contamination from at least 1–2 inches around the repair zone. API 650 SC.4.4 requires surfaces of carbon steel plates to be free of rust and scale prior to welding. Contaminated base metal causes porosity, weak fusion, and weld failure.
If the damage area is large or base metal is thin from corrosion, cut a patch plate of matching steel gauge and fit it up before welding. Use clamps and tack welds to maintain uniform gap before running full beads—this is especially critical on curved tank surfaces where inconsistent fit-up leads to weld defects.
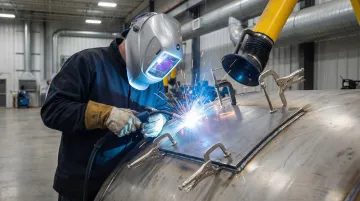
Step 5: Weld the Tank and Select the Right Process
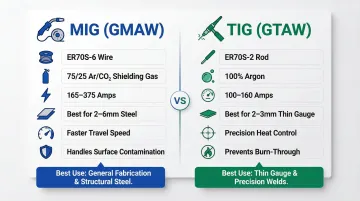
MIG (GMAW) with ER70S-6 wire is the most common choice for mild steel diesel tanks due to good deposition rate, better handling of surface contamination, and faster travel speed. TIG (GTAW) with ER70S-2 rod is preferred for thin-gauge sections or precision corner welds where heat control is critical to prevent burn-through.
MIG Parameter Ranges for 2-6mm Mild Steel:
| Wire Diameter | Amperage (Amps) | Voltage (Volts) | Wire Feed Speed (ipm) | Shielding Gas |
|---|---|---|---|---|
| 0.035 in (0.9 mm) | 165–300 | 24–28 | 360–520 | 75% Ar / 25% CO₂ |
| 0.045 in (1.1 mm) | 200–375 | 24–30 | 210–360 | 75% Ar / 25% CO₂ |
TIG Parameter Ranges for 2-3mm Mild Steel:
| Filler Wire Size | Tungsten Size | Amperage (Amps) | Shielding Gas |
|---|---|---|---|
| 1/16 in | 1/16 in | 100–160 | 100% Argon |
| 1/16–3/32 in | 3/32 in | 100–160 | 100% Argon |
After welding, visually inspect the completed weld for cracks, undercut, or porosity. AWS D1.1 Table 8.1 specifies that for material less than 1 inch thick, undercut shall not exceed 1/32 inch, and visible piping porosity shall not exceed 3/8 inch in any linear inch of weld.
The tank must be pressure-tested with low-pressure air (3–5 PSI maximum) and soapy water applied to all weld joints to confirm a leak-free result before any fuel is reintroduced. API 650 allows shop-assembled tanks to be tested with internal air pressure of 2–3 PSI gauge, with a maximum of 5 PSI for tanks with diameter of 12 feet or less.
What You Need Before Welding a Steel Diesel Fuel Tank
Preparation quality directly determines whether the repair is safe and durable. Staging the right tools and materials before starting eliminates unplanned shortcuts that cause accidents or failed welds.
Equipment and PPE Required
- MIG or TIG welder with appropriate settings for steel
- Angle grinder and wire brush
- Combustible gas (LEL) detector with current calibration
- Compressed air source
- Low-pressure air pressure gauge
- Fire extinguisher rated for flammable liquids (Class B)
- Approved flammable-liquid drain containers
- Auto-darkening welding helmet
- FR (flame-resistant) jacket
- Leather welding gloves
- Safety glasses
- Respirator for fume protection (OSHA 29 CFR 1910.134 compliant)
Materials and Consumables
- ER70S-6 MIG wire (or ER70S-2 TIG rod) matched to tank's steel grade
- Appropriate shielding gas (75/25 Argon/CO₂ for MIG; 100% Argon for TIG)
- Mild steel patch plate stock if needed (matched gauge to tank wall)
- Clean hot water plus degreasing detergent for cleaning
Skill and Safety Readiness
Fuel tank welding requires demonstrated proficiency in out-of-position welding and a working understanding of combustion hazards. A dedicated fire watch person must be present throughout the job.
NFPA 51B mandates that fire watch be maintained for a minimum of 60 minutes after hot work completion to catch smoldering fires. For tanks on vehicles or fixed structures, verify that local fire codes and OSHA hot work permit requirements are met before beginning.
Key Parameters That Affect Weld Quality on a Steel Diesel Fuel Tank
Even with proper safety prep, weld quality comes down to how well the operator controls several technical variables. Poor parameter selection leads to incomplete fusion, porosity, undercut, or burn-through on a tank wall.
Base Metal Thickness and Heat Input
Tank wall thickness (typically 2mm–6mm for steel diesel tanks) directly dictates amperage selection and travel speed. Too much heat warps thin sections and risks burn-through; too little causes cold laps and lack of fusion.
Common MIG settings by thickness:
| Steel Thickness | Wire Size | Amperage | Voltage |
|---|---|---|---|
| 3mm | 0.035 in. | 165–200 A | 24–26 V |
| 5mm | 0.035 in. | 250–300 A | 26–28 V |
Adjust travel speed to maintain a consistent weld pool without letting heat build up in one spot.
Shielding Gas Coverage
Insufficient shielding gas flow causes atmospheric contamination—porosity and oxidation—in the weld pool. Target 25–35 CFH for MIG welding and 10–25 CFH for TIG welding. In drafty or outdoor environments, use windshields or enclosures around the weld zone to maintain consistent gas coverage.
Joint Fit-Up and Gap Control
Use clamps and tack welds to hold uniform gap on patch plates or seam repairs before running full beads. Gaps too wide or too narrow both cause defects. On curved tank surfaces, secure the patch thoroughly before welding—gravity and thermal expansion will shift an unsecured patch mid-bead, producing inconsistent fusion along the entire seam.
Common Mistakes When Welding a Steel Diesel Fuel Tank
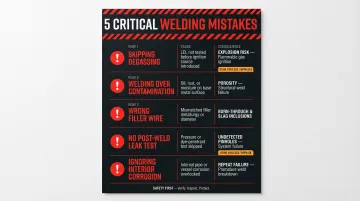
Skipping or Rushing the Degassing Step
This is the most dangerous mistake. Welders who rely on draining alone without chemical testing assume the tank is safe when it is not. Even a trace of vapor in a confined interior space is enough to ignite. NIOSH FACE 07CA006 documents a 25-year-old welder who died from injuries received from an explosion of a diesel fuel tank he was welding—the tank still had fuel in it, and the victim did not correctly purge or ventilate the fuel tank before beginning to weld.
An LEL meter reading at safe levels is a hard prerequisite, not a suggestion. The U.S. Chemical Safety and Hazard Investigation Board identified over 60 fatalities since 1990 due to explosions and fires from hot work activities on tanks.
Welding Over Rust, Paint, or Contamination
Even a thin layer of rust, mill scale, or residual fuel film on the base metal contaminates the weld pool—resulting in porosity, slag inclusions, and weld joints that fail under pressure.
Contaminants on the filler metal are equally problematic. Paint, grease, oil, tape, and glue all release gases when exposed to the welding arc, resulting in trapped gas porosity and welds that look solid but leak under service conditions within weeks.
Common surface contaminants to remove before welding include:
- Rust and mill scale
- Residual fuel film or oil
- Paint, tape, or adhesive residue
- Grease or shop dirt
Using the Wrong Filler Wire or Process for the Steel Grade
Using generic flux-core wire (designed for structural steel outdoors) on a thin tank wall causes excessive spatter, heat buildup, and potential burn-through. ER70S-6 solid wire with gas shielding is the standard choice for tank repair welding on mild steel. Flux-core processes also leave slag inclusions—non-metallic residues trapped in weld metal that interrupt metallic bonds.
Skipping the Post-Weld Leak Test
Visually inspecting the weld and calling it done is a mistake. Hairline cracks and pinholes in weld toes are not visible to the naked eye and require a pressure test with soapy water to catch.
API 650 allows pneumatic testing at 2–3 PSI gauge for shop-assembled tanks, with a maximum of 5 PSI for small-diameter tanks. However, NFPA 30 Section 21.5.2.1 explicitly states: "Air pressure shall not be used to test tanks that contain flammable or combustible liquids or vapors." The tank must be completely purged and vapor-free before applying any test pressure.
Ignoring Interior Corrosion After the Weld Is Complete
A successful weld repair seals the hole but does nothing to address ongoing corrosion on the tank's interior wall. The same conditions that caused the original failure will cause another failure in the same or adjacent area. Without interior surface protection, the repair is a short-term fix. API RP 652 notes that a properly selected and applied lining should be expected to provide a service life of 10–20 years, far exceeding the durability of a weld repair alone.
When Welding Isn't Enough: Alternatives and Professional Tank Repair
Welding is effective for isolated cracks, pinhole leaks, and seam failures on otherwise structurally sound tanks. However, several conditions make welding insufficient or inappropriate as a standalone repair strategy.
Tank with Widespread Corrosion or Pitting
Broad wall thinning from corrosion means patching individual holes only relocates the failure point. Professional inspection using ultrasonic testing can confirm whether wall thickness is still within serviceable tolerances. API 653 sets the minimum acceptable thickness at 0.1 inch (2.54 mm) for any tank course.
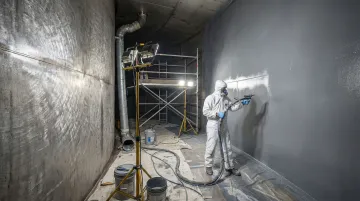
If the base metal is compromised across a wide area, interior lining is the appropriate next step. AmTech Tank Lining & Repair applies systems including Armor Shield and the DuraChem 500 series, which arrest active corrosion and restore structural integrity. Their DuraChem DK2 system is formulated for constant immersion with diesel, kerosene, and #2 oil — it creates a monolithic 80–125 mil barrier that bonds to prepared steel at up to 1,965 PSI adhesion strength, extending service life by decades rather than months.
Structural or Seam Failure Across Multiple Points
Multiple active leaks, a full-length failed seam, or compromised baffles and fittings call for rebarreling or full replacement — not multiple patch welds. Rebarreling involves cutting the end caps, replacing the barrel, rewelding, and pressure testing.
Signs that indicate this threshold has been reached include:
- Multiple leak points appearing within the same inspection cycle
- Weld seam failure spanning more than 12 inches continuously
- Compromised baffles, sumps, or fitting attachments
- Plate strain exceeding acceptable limits (API 653 B.4.2 sets this at 2%–3%)
- Edge settlement beyond permissible tolerances under API 653
Full Tank Replacement
A tank is beyond economical repair when it shows severe age-related corrosion throughout, impact damage, or compliance gaps for critical systems. For high-duty-cycle industrial or fleet equipment, downtime costs alone often make a short-term weld repair uneconomical — replacement is the faster path back to operation.
NFPA 30 Section 2.4.3 requires that any tank relocated, structurally damaged, repaired, or suspected of leaking be tested in a manner acceptable to the authority having jurisdiction before returning to service.
Conclusion
Welding a steel diesel fuel tank is a manageable repair when safety prerequisites are rigorously followed—complete fuel removal, thorough cleaning, verified vapor-free conditions, and proper weld technique are non-negotiable for a safe and durable result. Most weld failures and safety incidents trace back to inadequate preparation, not the welding process itself. The costliest shortcuts are consistent: skipping the gas detector test, welding over contaminated metal, and bypassing the post-weld pressure test.
For tanks where welding alone cannot address the underlying corrosion or structural condition, a professional tank repair and interior lining program provides lasting protection against further degradation. AmTech Tank Lining & Repair has been restoring and relining petroleum and fuel storage tanks—both aboveground and underground—since the late 1960s. For complex repairs or tanks with significant corrosion, their field crews can assess structural condition, perform welding where needed, and apply a compatible interior lining system to extend service life.
Frequently Asked Questions
Can a steel diesel fuel tank be repaired or welded?
Yes, steel diesel fuel tanks can be welded, but only after the tank is fully drained, cleaned, and chemically tested with an LEL meter to confirm all fuel vapor has been removed. The repair process requires specific safety equipment, welding expertise, and post-weld pressure testing before returning the tank to service.
What welding method is best for a steel diesel fuel tank?
MIG welding with ER70S-6 solid wire and 75/25 Argon/CO₂ shielding gas is the most common choice for mild steel diesel tanks due to its speed and ability to handle minor surface contamination. TIG welding with ER70S-2 rod is preferred for thin-gauge sections requiring tighter heat control to prevent burn-through.
How do you safely remove fuel vapors from a diesel tank before welding?
Drain all fuel, rinse with hot soapy water multiple times, purge with compressed air for at least one hour, and verify with a combustible gas (LEL) detector that vapor levels are below 0.6% LEL for diesel. Hot work begins only after readings confirm safe conditions.
How do you test a diesel fuel tank for leaks after welding?
Apply low-pressure air (3–5 PSI maximum) inside the tank and apply soapy water to all weld joints externally. Bubbling indicates a leak. This test must be completed before any fuel is reintroduced to the tank, and the tank must be completely vapor-free before applying test pressure.
Can you weld a diesel fuel tank without removing it from the vehicle?
While technically possible with a full water-fill method and strict vapor control, removing the tank is the safer approach. It provides full access to all surfaces, eliminates fire risk to surrounding fuel system components, and allows proper post-weld pressure testing.
When should you replace or professionally reline a diesel fuel tank instead of welding it?
Replacement or professional interior relining is the better choice when the tank wall is thinned by widespread corrosion, when there are multiple active leak points, or when a prior weld repair has already failed. At that point, the base metal can no longer reliably hold a weld — relining or full tank replacement is the only viable path forward.