This guide provides facility managers and operators with a clear, end-to-end inspection framework: the tools required, the three primary inspection methods, how to interpret findings, and what action to take when defects are discovered.
Key Takeaways
- Annual exterior and water quality inspections are required at minimum; full interior dry inspections every 3–5 years
- Three inspection methods exist: visual dry inspection (tank drained), in-service inspection (tank operational), and ROV/NDT-assisted inspection
- Inspection targets: tank shell, coating, foundation, roof, appurtenances, water quality, and floor condition
- Out-of-spec findings require immediate remediation — and often taking the tank out of service
- Interior inspections require OSHA confined space protocols; disinfection and sampling must clear before return to service
What You Need to Inspect a Cold Water Storage Tank
Arriving unprepared to a cold water storage tank inspection wastes time, produces unreliable findings, and puts personnel at risk. Before starting, confirm you have the right equipment, documentation, and site conditions in place.
Tools and Equipment Required
Field equipment:
- Waterproof flashlight or headlamp
- Water quality test kit (minimum: free chlorine residual, pH, turbidity)
- Ultrasonic thickness (UT) gauge for shell/floor spot-checks
- Inspection mirror for hard-to-see areas
- Calibrated dipstick or water level indicator
- Calibrated tape measure for settlement checks
Documentation and records:
- Standardized inspection log (date, inspector name, tank location, description, coating date/material)
- Camera or smartphone for photographic evidence
- Copy of the previous inspection record for trend comparison
Once your equipment is staged, verify that site conditions meet the minimum requirements for the inspection type you're conducting.
Preconditions and Setup
For dry (interior) inspections:
- Tank must be fully drained and cleaned
- Confined space entry permit in place
- Atmospheric testing (oxygen level 19.5–23.5%, flammable gas <10% LFL, toxic gas within limits) completed before entry
- Tank isolated from inlet/outlet lines with lockout/tagout
For in-service inspections:
- Confirm safe physical access to all exterior appurtenances
- Verify sample ports are accessible and properly labeled
- Ensure water level indicator and overflow pipe are visible
- Clear exterior perimeter of debris or vegetation
Cold Water Storage Tank Inspection Methods
The method selected depends on the inspection objective, available resources, and whether the tank can be taken out of service. A complete inspection program typically uses all three methods on a rotating schedule.
Method 1: Visual Dry Inspection (Interior and Exterior)
Description: The most comprehensive inspection method—the tank is fully drained and cleaned, allowing direct visual and physical examination of the tank floor, walls, coating, welds, and all internal fittings; simultaneously the full exterior is assessed.
Tools needed: Flashlight, inspection mirror, UT gauge, photographic equipment, coating adhesion test tool, confined space PPE kit, inspection checklist.
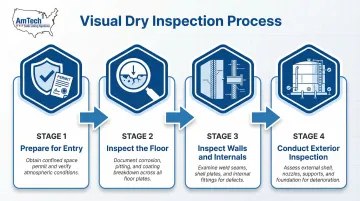
Step-by-step process:
Prepare for entry — Drain and clean the tank; obtain confined space entry permit; conduct atmospheric testing; establish attendant and rescue protocols per OSHA 1910.146
Inspect the floor — Systematically examine for sediment accumulation, pitting, coating blisters or delamination, active corrosion, and standing water patches; use UT gauge to spot-check floor plate thickness in suspect areas
Inspect walls and internals — Examine internal wall surfaces and weld seams from floor to roof; look for coating failure, rust staining, scaling, and cracks; check manways, roof support columns, and ladder anchors for corrosion or mechanical damage
Conduct exterior inspection — Assess foundation for settling, cracking, or vegetation intrusion; examine shell for rust, pitting, or paint failure; check roof for ponding water, holes, or seam corrosion; verify overflow pipe, air vents (screened and sealed), roof hatch (locked, gasketed), access ladder, water level indicator, and cathodic protection anode plates are serviceable
Pros and cons: No other method matches its diagnostic completeness—dry inspection reveals all internal and external defects with no ambiguity. However, it requires tank downtime, full draining, cleaning, and confined space entry, making it operationally disruptive and resource-intensive.
When full dewatering isn't feasible, in-service inspection covers what can be assessed without taking the tank offline.
Method 2: In-Service Visual and Water Quality Inspection
Description: Conducted without draining—covers a complete exterior visual walkdown and collection of water samples from the outlet or dedicated sampling port; used for routine annual checks between full dry inspections.
What you'll need: Water quality test kit (free chlorine residual, pH, turbidity), sample bottles for laboratory coliform testing, inspection checklist, binoculars (for elevated tanks), flashlight, photographic equipment.
Step-by-step process:
Walk the perimeter — Check foundation condition, shell exterior (rust, coating failure, visible leaks), roof and all appurtenances (overflow pipe functional, vent screens intact, roof hatch locked and sealed, no signs of bird or animal intrusion)
Collect water samples — Sample from outlet port or dedicated tap; test immediately for free chlorine residual (EPA maximum 4.0 mg/L for chlorine) and pH; note turbidity visually and with test kit; dispatch sealed sample bottles per state/local authority protocol if laboratory testing required
Document observations — Record water level indicator reading; verify overflow pipe flap valve cover is accessible and functional; document all observations with photos and complete inspection log
Pros and cons: Requires no downtime, can be performed by trained in-house operators, and captures water quality and exterior integrity regularly. However, it cannot detect interior coating failure, floor corrosion, sediment accumulation, or structural defects inside the tank—periodic dry or NDT inspections are still required to assess interior condition.
Where interior access isn't possible between dry cycles, NDT and ROV technology bridges the gap.
Method 3: Non-Destructive Testing (NDT) and ROV-Assisted Inspection
Description: Uses technology—including ultrasonic thickness testing, Magnetic Flux Leakage (MFL) floor scanning, and Remotely Operated Vehicle (ROV) cameras—to assess the interior structural condition without full dewatering; requires specialist contractors and equipment.
Equipment required: Ultrasonic thickness gauge (handheld or crawler-mounted), MFL floor scanner, ROV with camera and recording capability, data logging software, access to tank manways or entry ports.
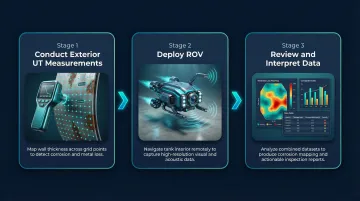
Step-by-step process:
Conduct exterior UT measurements — Access tank shell from exterior for UT measurements at defined grid points or areas of visible concern; record thickness readings against original design specification and compare with previous inspection data to identify loss over time
Deploy ROV — Guide ROV through manway or access hatch with tank full or partially full; systematically traverse tank floor and interior walls, recording video and photographic evidence of coating condition, sediment presence, and structural anomalies
Review and interpret data — Compile UT thickness loss maps, ROV footage review, and MFL floor scan reports; flag zones where metal loss exceeds acceptable limits for follow-up dry inspection and repair
Pros and cons: Enables interior condition assessment without taking the tank out of service—the preferred approach for fire suppression and critical supply tanks that cannot be taken offline. However, ROV and NDT require specialist operators and more costly equipment, MFL scanning is limited to the floor plate, and NDT cannot fully substitute for a dry inspection when cleaning, coating repair, or confined space remediation is needed.
How to Interpret Cold Water Storage Tank Inspection Results
Misreading results—for example, treating active pitting corrosion as benign surface staining, or dismissing a failing vent screen as cosmetic—leads to deferred remediation that can escalate into structural failure, water contamination events (including Legionella or coliform outbreaks), regulatory violations, and costly emergency response. Findings must be categorized and acted upon, not just recorded.
Normal/Acceptable Findings
Characteristics:
- Coating intact with no blistering, peeling, or delamination
- No active corrosion, pitting, or rust on shell, floor, or welds
- Sediment-free tank floor
- Free chlorine residual within system's target range
- pH within acceptable limits
- All appurtenances functional, screened, and sealed
Action required: Document findings, schedule next inspection per regulatory cycle (typically 3–5 years per AWWA Manual M42), retain records for minimum five years.
Minor/Monitor Findings
Characteristics:
- Light surface staining or localized discoloration on interior walls
- Minor sediment or fine particulate on tank floor
- Slight scaling on internal fittings
- Small vent screen tear or minor roof coating wear without active rust
Action required: Schedule accelerated cleaning, document with photos and UT spot-checks to measure coating/metal integrity under staining, re-inspect within 6–12 months rather than waiting for next full cycle.
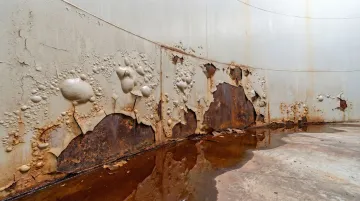
Out-of-Spec Findings Requiring Immediate Action
Characteristics:
- Active corrosion with visible pitting or measurable metal loss below design thickness
- Coating failure with blistering, delamination, or exposed substrate over significant surface area
- Structural cracks in welds, shell, or foundation
- Water quality failure (coliform detection, disinfectant residual below minimum, persistent turbidity elevation, biological contamination evidence)
- Failed or missing vent screens, broken roof hatches, or compromised overflow pipe
Action required: Take the tank out of service where operationally possible. Document all findings with photographs and UT measurements, notify the relevant regulatory authority if a water quality exceedance is confirmed, and collect follow-up water samples to establish a remediation baseline. Engage a qualified engineer to assess structural and coating condition before returning the tank to service. For interior surface restoration in potable cold water service, NSF/ANSI-compliant lining systems — including AmTech's Armor Shield linings and DuraChem 500 series — are field-applied options designed to address coating failure and corrosion damage while maintaining compliance.
Common Errors in Cold Water Storage Tank Inspection
Even experienced inspectors fall into predictable traps that compromise findings. These four errors are among the most common — and the most costly to discover after the fact.
- Skip the interior, miss the damage. Floor corrosion, coating delamination, sediment buildup, and biofilm are only visible from inside. Exterior checks during service do not substitute for periodic interior inspections.
- Don't trust a visual rust assessment alone. A minor rust patch can overlie significant metal loss undetectable by eye. Confirm every corrosion finding with at least a spot UT measurement per ASTM E797 standards.
- Check every appurtenance, not just the shell. Vent screens, roof hatch gaskets, overflow pipe flap valves, water level indicator ports, and cathodic protection anode connections are common contamination and failure points — and routinely overlooked.
- Photograph everything, every time. Without a dated photographic baseline and UT thickness records, there is no way to distinguish new degradation from pre-existing conditions, leaving no defensible record for regulators or repair prioritization.
Safety and Best Practices
Confined Space and Isolation Requirements
All interior dry inspections are classified as permit-required confined space entry under OSHA 1910.146. Before any inspector enters:
- Tank must be isolated from all inlet, outlet, and overflow lines via lockout/tagout
- Atmospheric testing must confirm oxygen level between 19.5–23.5% and that flammable and toxic gas concentrations are within permissible limits
- A trained outside attendant must be stationed at the entry point throughout the inspection with a written emergency rescue plan in place
Personal Protective Equipment (PPE)
Minimum PPE for interior inspection:
- Hard hat
- Non-slip footwear
- Chemical-resistant gloves
- Safety harness with fall arrest anchorage (critical for elevated tanks or ladder entry)
- Respiratory protection appropriate to atmosphere test results
For exterior inspections: Fall protection is required for any work above six feet.
Return-to-Service and Disinfection Protocol
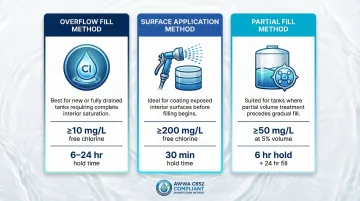
After any interior inspection, cleaning, or coating application, the tank must be disinfected and flushed in accordance with AWWA C652 or the applicable state-mandated procedure. Three approved chlorination methods are recognized:
- Overflow Fill Method — Fill to overflow with potable water; achieve ≥10 mg/L free chlorine and hold 6 hrs (gas/chemical pump) or 24 hrs (hypochlorite)
- Surface Application Method — Apply ≥200 mg/L free chlorine solution directly to all water-contact surfaces; hold 30 minutes minimum
- Partial Fill Method — Add chlorine to 5% of tank volume at ≥50 mg/L free chlorine, hold 6 hours, then fill to overflow and hold an additional 24 hours
Water samples must be collected to confirm sufficient disinfectant residual and absence of coliform bacteria before the tank is returned to potable service. Where new interior coatings were applied during the inspection outage, state authorities may also require sampling for volatile organic compound (VOC) leaching before returning the tank to service.
Frequently Asked Questions
How often should cold water storage tanks be inspected?
Annual exterior and water quality inspections are the minimum. Full interior (dry) inspections are typically required every 3–5 years based on jurisdiction, tank type, age, and risk classification. NFPA 25 mandates interior inspections every 3 years for unprotected steel fire tanks and every 5 years for all others.
What codes or standards govern cold water storage tank inspections?
The primary standards governing cold water storage tank inspections are:
- AWWA D100 — steel water tank design and construction
- AWWA C652 — disinfection of water storage facilities
- NFPA 25 — fire suppression water tanks
- EPA/state requirements under the Safe Drinking Water Act (40 CFR Parts 141–142)
- NSF/ANSI 61 — coating materials in potable water contact
Do cold water storage tanks need to be emptied for inspection?
A full interior inspection requires the tank to be drained and cleaned, while in-service exterior and water quality inspections do not. ROV and NDT methods allow some degree of interior assessment without full dewatering, but cannot fully replace a periodic dry inspection for coating evaluation, cleaning, and confined space remediation work.
What are the most common defects found during cold water storage tank inspections?
The most frequently identified issues include interior coating failure (blistering, delamination, or complete exposure of substrate), corrosion and pitting on the tank floor and lower shell, sediment and biofilm accumulation, failed or missing vent screens allowing contaminant ingress, and deteriorated roof hatch gaskets or overflow pipe covers.
What is the difference between a dry inspection and an in-service inspection for a cold water tank?
A dry inspection requires the tank to be drained, cleaned, and entered under confined space protocols—allowing direct examination of all internal surfaces, coatings, welds, and the floor. An in-service inspection is conducted with the tank full and operational, covering only the exterior and water quality parameters, and is used for routine annual monitoring between full dry inspection cycles.
What should be done if a cold water tank inspection reveals coating failure or significant corrosion?
A qualified engineer should assess the extent of metal loss (via UT measurement) and determine whether the tank can remain in service. Remediation typically involves cleaning, surface preparation, and application of an NSF/ANSI-compliant interior lining. Contractors such as AmTech Tank Lining & Repair (55+ years of experience, NSF/ANSI-compliant systems) can restore tank integrity and extend service life without full replacement.