Introduction
FRP tanks can fail without warning. Chemical attack can penetrate deep into the corrosion barrier layer (CBL) while the exterior shell looks completely intact—a failure mode that catches facility managers off guard.
Unlike steel tanks, where corrosion shows up visibly on the surface, fiberglass reinforced plastic tanks require a different inspection approach entirely. According to a Florida Department of Environmental Protection leak autopsy study, 27% of fiberglass tank failures result from punctures and 22% from physical/mechanical damage—not the slow-developing corrosion patterns inspectors are trained to spot on steel vessels.
This guide walks through a systematic FRP tank inspection checklist—from pre-inspection preparation and external/internal examination to advanced NDT methods and safety protocols. Whether your tanks hold process chemicals or potable water, the goal is the same: catch degradation before it becomes a containment failure.
Key Takeaways
- Inspection frequency: Visual checks twice yearly; full internal/external inspection every 5 years — every 2 years for aggressive chemicals like sodium hypochlorite
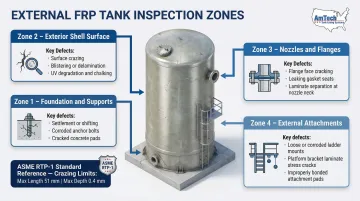
- Four critical zones: Structural supports/foundation, exterior shell surface, interior corrosion barrier layer (CBL), and nozzles/fittings
- Key defects to document: Cracks, crazing, delamination, blistering, UV degradation, chemical attack, and reduced Barcol hardness
- Advanced NDT methods: Acoustic emission testing, ultrasonic thickness measurement, and infrared thermography for suspected subsurface damage
- Classification system: Categorize findings as acceptable, monitor-and-track, or out-of-spec for immediate repair
What You Need Before Inspecting an FRP Tank
Effective FRP inspection demands thorough preparation. Skipping this phase produces incomplete, unreliable results that can miss critical defects or trigger unnecessary shutdowns.
Tools and Equipment Required
Core inspection tools:
- Barcol hardness tester (ASTM D2583 compliant)
- Handheld torch or high-intensity flashlight
- Magnifier (minimum 10× magnification)
- Feeler gauges for crack width measurement
- Measuring tape
- Camera for documentation
Specialized equipment (condition-dependent):
- Ultrasonic thickness meter (for suspected delaminations)
- Infrared thermography equipment (for warm tanks in aggressive service)
Documentation and Preconditions
Required documentation:
- Original design drawings and laminate specifications
- Previous inspection reports for trend analysis
- Process chemical data (stored substances, concentrations, temperatures)
- Manufacturer records (year built, resin type, corrosion barrier layer (CBL) thickness)
- Operating history (fill/draw cycles, any previous repairs)
Mandatory preconditions:
- Tank must be emptied, cleaned, and free of residual chemicals
- Air quality verified safe for confined space entry (oxygen level, toxic vapor concentration)
- All connected piping, valves, and instrumentation isolated per OSHA 1910.147
- FRP surfaces must be completely dry (wet surfaces produce artificially low Barcol readings)
External FRP Tank Inspection Checklist
External inspection should occur during operation (twice yearly minimum) and at shutdown. Some defects (soft spots, translucency changes, blistering) become more visible on cool, empty tanks.
Foundation, Anchoring, and Supports
Check these components at each inspection interval:
- Examine anchor bolts, nuts, and washers for corrosion; check FRP ear anchoring margins for cracking
- Evaluate support legs, saddles, and ring supports for coating integrity and secure attachment to the tank body
- Look for foundation settlement, cracking, moisture accumulation in tank pits, or uneven loading patterns
Exterior Shell Surface
Examine the full exterior surface of shell, head, and skirt for:
- UV damage and topcoat degradation (chalking limited to surface resin is acceptable per ASME RTP-1)
- Surface cracks and crazing patterns (crazing deeper than 0.4 mm requires documentation)
- Delamination or peeling layers
- Blistering, bubbles, or pimples (blisters exceeding 6.4 mm diameter are rejectable)
- Surface pits and porosity
- Physical impact damage
- Barcol hardness checks across multiple zones (note any soft spots)
ASME RTP-1 acceptance criteria: Cracks and delamination are never acceptable; crazing is limited to maximum 51 mm long by 0.4 mm deep with density not exceeding 1 per cm².
Nozzles, Flanges, and Manways
For each nozzle connection:
- Inspect for cracks at neck and flange blade
- Check for delamination at flange interface
- Verify condition of bolts, nuts, washers, and gaskets
- Confirm gasket material matches design specification
- Ensure connected piping is adequately supported (nozzle loading causes premature failure)
Fittings and External Attachments
Examine all external attachments:
- Inspect ladders, handrails, platforms, and stairways for corrosion and coating breakdown
- Check FRP overlaminate at attachment points for cracking or separation
- Verify vacuum rings and stiffening rings are intact and securely connected to the tank body
Internal FRP Tank Inspection Checklist
Internal inspection directly evaluates the corrosion barrier layer (CBL) that protects the structural wall from chemical attack. Per industry guidance and state regulations, comprehensive internal inspection is required every 5 years—shortened to every 2 years for aggressive chemicals like sodium hypochlorite or high-concentration sulfuric acid.
Preparation and Access
Before entry:
- Confirm all OSHA 1910.146 confined space entry requirements are met
- Verify tank is clean and completely dry (moisture invalidates Barcol readings)
- Ensure adequate lighting and access to all internal zones
- Review laminate design to understand CBL thickness and layer structure
Corrosion Barrier Layer (CBL) Condition
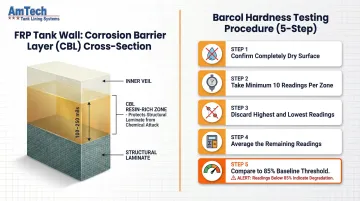
The CBL typically consists of 100 to 250 mils (2.5–6.3 mm) of resin-rich material, with polymer resin comprising 70–85% of total volume. Inspect at the bottom, cylinder walls, and top head for:
- Discoloration or staining — signals chemical permeation and oxidation
- Cracks and crazing — microcracking begins in the resin-rich surface and progresses into the laminate
- Delaminations and blistering — caused by subsurface pressure buildup from osmotic action
- Pimples, surface pits, and porosity
- Scratches and wrinkles
- Barcol hardness: Take a minimum of 10 readings per zone, discard the highest and lowest, then average the rest. Readings below 85% of the original baseline indicate chemical attack.
Critical Transition Zones
Bottom-to-cylinder and top-to-cylinder junctions are high-stress areas prone to failure. Pay particular attention to:
- Discoloration patterns at transition zones
- Laminate condition and integrity
- Barcol hardness at junctions
- Divot method for suspect areas: gentle grinding or drilling, examined under 10× magnification, reveals crack depth relative to CBL thickness
Internal Nozzle Connections and Internals
After examining transition zones, move to nozzle connections — these are common failure initiation points that are easy to overlook. Inspect all internal nozzle-to-vessel connections for:
- Discoloration indicating chemical attack
- Delamination and blistering at connection points
- Internal bolting material and condition
Also inspect internal components across both their connection points and exposed surfaces: dip pipes, baffles, vortex breakers, spray pipes, distributors, and bed limiters.
Advanced NDT Methods for FRP Tank Inspection
Advanced non-destructive testing becomes necessary when visual inspection reveals suspicious areas, or when tank service conditions (aggressive chemicals, elevated pressures, extended service age) demand quantitative structural data beyond visual methods.
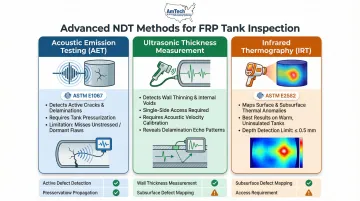
Acoustic Emission Testing (AET)
Governed by ASTM E1067, AET loads the tank under controlled pressure and detects active stress waves from defect propagation. It's particularly useful for finding hidden delaminations, active cracks, and areas of ongoing degradation.
The procedure involves attaching AE transducers at strategic locations, pressurizing the tank to test level (typically 1.5× operating pressure), and recording emission events during the hold period. Equipment required includes:
- AE transducers attached to tank surface
- Data acquisition system
- Pressurization equipment
One important limitation: AET identifies active defects under stress but does not provide wall thickness data. Flaws in unstressed areas will not generate acoustic emissions. When thickness data is the priority, ultrasonic measurement fills that gap.
Ultrasonic Thickness Measurement
Ultrasonic testing uses sound wave pulse-echo to measure laminate thickness and identify delaminations, voids, and resin-to-fiber separation from one side of the wall — no access to the interior required.
One consideration unique to FRP: unlike steel, sonic velocity varies widely (up to 15%) due to glass concentration, porosity, and resin curing. Valid measurements require statistical minimum velocity databases rather than single-point calibration. From a properly calibrated scan, the method reveals:
- Remaining laminate thickness without destructive testing
- Delamination blisters (produce characteristic echo patterns)
- Polymer damage status through attenuation-based analysis
The procedure involves calibrating equipment for the specific FRP composition, taking readings across the shell in a grid pattern, and documenting areas showing thickness reduction or abnormal echo patterns. IRT can then extend this picture by mapping surface thermal anomalies across the same areas.
Infrared Thermography (IRT)
Governed by ASTM E2582, IRT scans for temperature differentials on the tank surface that reveal structural anomalies invisible to the eye. It detects:
- Thinner laminate areas (warmer zones)
- Permeation zones from chemical attack
- Dry voids and delamination air gaps
- Deposit buildup (cooler spots in tanks with warm contents)
IRT is most effective on uninsulated tanks in service with warm contents, where the thermal gradient is sharpest. It's particularly well-suited for tanks storing aggressive chemicals like sodium hypochlorite or chlorine dioxide solutions. The main constraint: low thermal conductivity of FRP limits detection depth, typically to 0.5 mm for line-scanning systems.
How to Interpret FRP Tank Inspection Results
Knowing what to look for is only half the job. Classifying findings correctly determines whether the tank stays in service, needs monitoring, requires repair, or must come out of service immediately. Misreading results in either direction carries real cost and safety consequences.
Normal / Acceptable Findings
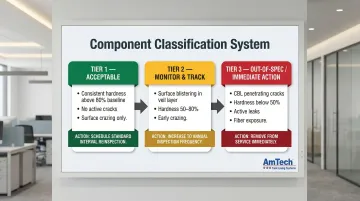
An acceptable FRP tank exhibits:
- Consistent topcoat color with minor weathering
- Barcol hardness readings within 80% of design specification values
- No active cracks or delaminations
- Surface crazing limited to gel coat only, not penetrating CBL
- Minor UV chalking confined to surface resin layer
Action: Document findings, schedule next inspection per standard intervals (5 years for standard service, 2 years for aggressive chemicals).
Minor Issues: Monitor and Track
Conditions warranting documentation and increased monitoring but not immediate shutdown:
- Surface blistering confined to inner veil layer
- Early-stage crazing that has not reached structural wall
- Slight hardness reduction (50-80% of specification) without other indicators
- Minor UV degradation of topcoat without underlying laminate exposure
Action: Increase inspection frequency to annual, mark and photograph all affected areas, consult an experienced FRP specialist to establish monitoring protocol.
Out-of-Spec: Immediate Action Required
Findings requiring immediate removal from service or emergency repair:
- Cracks, delaminations, or blistering penetrating through CBL into structural wall
- Barcol hardness readings below 50% of design specification
- Active leaks or weeping at any surface or nozzle
- Severe chemical attack with laminate dissolution or fiber exposure
- Visible structural damage compromising tank integrity
Action: Remove the tank from service immediately. Engage a qualified FRP repair contractor to assess scope and restore the corrosion barrier. AmTech Tank Lining & Repair's fiberglass relining systems use AT BiFlex® composite technology applied by in-house field crews experienced in structural FRP restoration.
Inspection Records and Reporting
Proper documentation must include:
- Location, size, and nature of all defects with photographs
- All Barcol hardness readings by zone
- Comparison against previous inspection reports to track progression
- Defect classifications (acceptable, monitor, or out-of-spec)
- Recommended repair actions
- Next scheduled inspection interval
Thorough records also position you for upcoming regulatory changes. The API 579-1/ASME FFS-1 Part 16 standard (expected ballot in 2026) will introduce a three-level quantitative assessment framework for FRP equipment. It moves evaluation away from subjective visual checks toward calculated Remaining Strength Factor (RSF) and Remaining Life predictions.
Common FRP Tank Inspection Errors to Avoid
Mistakes in FRP inspection lead to missed damage or incorrect fitness-for-service decisions. These three errors come up most often in the field:
Skipping internal inspection: The exterior shell can appear sound while the corrosion barrier layer (CBL) has already been chemically attacked. External visual checks alone won't catch this — internal inspection is non-negotiable for an accurate fitness-for-service determination.
Taking Barcol hardness readings on wet or contaminated surfaces: FRP surfaces must be clean and dry for valid hardness results. Wet surfaces produce artificially low readings, which either trigger unnecessary repairs or mask actual softening when the anomalous numbers get discounted.
Applying steel tank inspection standards to FRP: API 653 was written for steel tanks. FRP damage mechanisms — viscoelastic creep, chemical permeation, CBL degradation — differ fundamentally from the corrosion-driven failures that standard addresses. Using steel criteria on FRP leads to both under-inspection and misidentified findings.
Safety and Best Practices for FRP Tank Inspection
FRP tank inspection requires strict adherence to safety protocols. Unlike steel tanks, FRP vessels introduce additional hazards — residual chemical permeation through the laminate and a fragile corrosion barrier layer that can be permanently damaged by careless entry procedures. The protocols below address both worker safety and asset protection.
Confined Space Entry
- Follow OSHA 29 CFR 1910.146 for all internal inspections
- Verify atmospheric conditions (oxygen level, toxic vapor concentration) with calibrated gas detection equipment before entry
- Maintain continuous atmospheric monitoring during internal inspection
- Ensure forced air ventilation to address residual vapors (including styrene emissions from manufacturing or repair work)
Lockout/Tagout
- Per OSHA 29 CFR 1910.147, lockout all connected process lines, agitators, pumps, and heating elements before tank entry
- Relieve or isolate all stored energy sources — including pressurized process lines and thermally heated tank contents — before entry
Personal Protective Equipment
- Align PPE with last-stored chemical — consult Safety Data Sheets for chemical-specific requirements
- Include respiratory protection, chemical-resistant gloves, and eye protection per SDS guidance
- Use non-sparking, non-ferrous tools where flammable or explosive atmospheres may be present
Beyond personnel safety, FRP inspection also requires protecting the tank itself. The corrosion barrier layer (CBL) is the primary defense against chemical attack — mechanical damage during inspection can shorten tank service life significantly.
Protecting the Corrosion Barrier
- Wear soft-soled shoes to prevent mechanical damage to CBL
- Avoid dragging metal tools across internal surfaces
- Minimize mechanical damage that could compromise CBL integrity
Conclusion
A structured, consistent FRP tank inspection program—combining scheduled visual checks with periodic comprehensive internal-external examination and documentation—directly prevents containment failures, extends asset life, and protects both personnel and the environment. The global FRP vessels market, valued at $4.12 billion in 2025, reflects just how broadly fiberglass storage infrastructure is relied upon across critical industries.
When inspection reveals damage, working with certified professionals ensures repairs meet fitness-for-service standards—not just cosmetic fixes. AmTech Tank Lining & Repair's NLPA-certified field teams have repaired and relined FRP and composite tanks since the late 1960s, deploying proprietary AT BiFlex® fiberglass systems across all 50 US states, Canada, and the Caribbean. Their in-house crews handle everything from nozzle repair to full relining, with no subcontractors involved.
Frequently Asked Questions
How often should FRP tanks be inspected?
Standard practice requires visual external inspections twice yearly and comprehensive internal/external inspections every 5 years. For aggressive chemicals like sodium hypochlorite or high-concentration sulfuric acid, shorten the comprehensive inspection interval to 2 years due to accelerated resin degradation.
What are the most common defects found during FRP tank inspections?
The most frequently documented defects include:
- Surface cracks and crazing patterns
- Delamination between laminate layers
- Blistering of the corrosion barrier
- UV degradation of the topcoat
- Chemical attack of the resin matrix
- Reduced Barcol hardness indicating softening or incomplete cure
Can an FRP tank be repaired after damage is found during inspection?
Yes, many FRP tank defects are repairable through relining, laminate overlay, or fiberglass repair systems. When the corrosion barrier is breached but structural integrity remains intact, full interior relining with compatible composite materials can extend service life significantly — often at lower cost than full tank replacement.
What qualifications should an FRP tank inspector have?
Inspectors should be familiar with FRP laminate design, relevant standards (ASTM D3299, ASME RTP-1, ASTM E1067), and composite damage mechanisms. For regulated tanks, verify that your inspector holds an NLPA Special Inspector designation or equivalent industry certification before work begins.
What is the difference between external and internal FRP tank inspection?
External inspection assesses structural supports, shell surface, UV damage, and nozzle integrity without entering the tank. Internal inspection directly examines the corrosion barrier layer that protects the structural wall from chemical attack—making internal inspection essential for determining true fitness for service.
Which standards govern FRP tank inspection requirements?
Key standards include API Specification 12P (petroleum industry tanks), ASTM D3299 (filament-wound tanks), ASME RTP-1 (pressurized vessels up to 15 psig), AWWA D-120 (water service tanks), and ASTM E1067 (acoustic emission inspection). Industry bodies are also developing a new Part 16 under API 579-1/ASME FFS-1 to address in-service FRP fitness-for-service assessments.