Most facility teams don't catch problems until rust staining is already visible from the ground. By that point, corrosion may have been working beneath the film for months. This guide walks through the tools you need, three field-proven inspection methods, how to interpret what you find, and the specific signals that mean it's time to bring in a qualified contractor.
Key Takeaways
- Bolt holes, seam edges, and gasket contact zones are where coating failure originates — start every inspection there.
- Use three tiers in sequence: visual walk-around → physical probing → instrument-assisted testing.
- Blistering across seams, delamination, or high pinhole density are contractor-level defects — don't attempt to monitor and wait.
- AWWA D103-2019 calls for complete interior and exterior inspections at least every 3 to 5 years.
- Never enter a bolted steel tank without a full confined space entry plan.
What You Need Before You Start
Selecting the right tools and mapping your inspection sequence before arriving on site prevents re-walking and eliminates missed defects, particularly at the bolt-line zones that make bolted steel tanks more inspection-intensive than welded construction.
Tools and Indicators Required
Bring these to every inspection:
- High-lumen flashlight or work light — for low-light areas at the base ring and underneath roof overhangs
- Binoculars — for scanning upper shell rings and roof panels without lift access
- Scratch awl or pocket knife — for probing coating edges at seam lines to test adhesion
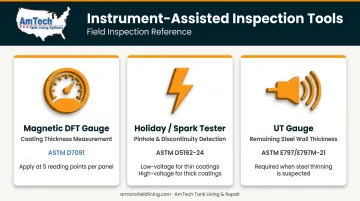
- Magnetic dry film thickness (DFT) gauge — per ASTM D7091 for nondestructive coating thickness measurement
- Holiday/spark tester — per ASTM D5162-24 for detecting pinholes and coating discontinuities
- Rubber mallet — for tap-testing blistered or suspicious-sounding areas
- Moisture meter — useful for confirming wet-pocket delamination beneath apparently intact surfaces
- Camera or phone — photo documentation is mandatory on every inspection
For more advanced steel wall assessment where corrosion is suspected, an ultrasonic thickness (UT) gauge per ASTM E797/E797M-21 is required.
Preconditions and Setup
With your equipment staged, confirm these conditions before the first step around the tank:
- Tank should be at normal operating level or lower
- Exterior surface must be dry — no active rain, dew, or condensation
- Adequate natural or artificial light throughout
- Some interior checks require the tank to be taken out of service entirely
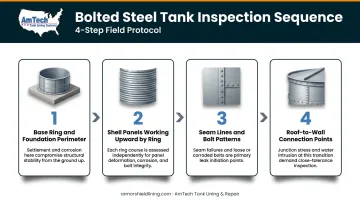
Establish your inspection sequence before walking the perimeter:
- Base ring and foundation perimeter
- Shell panels, working upward by ring
- Seam lines and bolt patterns
- Roof-to-wall connection points
Starting at the base ring catches substrate and coating failures early — conditions that often predict what you'll find higher up the shell.
Three Methods to Identify Coating Failure
Coating failure on bolted steel tanks progresses predictably: from high-stress zones outward to panel faces. The three methods below move from fastest to most quantified — start with a visual walk-around, escalate to tactile testing if something looks wrong, and bring in instruments when you need documented proof or suspect steel loss. Match the method to available tools and whether the tank is in service.
Method 1: Visual Walk-Around Inspection
A systematic naked-eye and binocular survey of all exterior surfaces from ground level.
Tools: Flashlight, binoculars, camera, inspection log.
Step-by-step:
- Start at the base ring and walk the full circumference slowly, scanning for rust staining or bleed-through at bolt lines
- Move upward ring by ring using binoculars for upper panels
- Finish with a close pass along every visible horizontal and vertical seam line
Key signs to document:
- Orange or brown rust streaking below bolt rows
- Coating blistering or bubbling on panel faces (rate using ASTM D714-25 photographic standards)
- White chalking or powdering — coating oxidation rated per ASTM D4214-23
- Peeling or flaking at seam edges
- Dark discoloration or product staining indicating micro-leaks at gaskets
- Rust percentage visible on panel surfaces, rated on the ASTM D610-25 0-to-10 scale
Pros: Fastest method, no special equipment, catches mid-to-late-stage failures clearly. Cons: Will miss early subsurface delamination and any interior coating issues.
Method 2: Physical / Tactile Inspection
Close-contact probing and percussion testing at suspect areas identified during the visual walk-around.
Tools: Scratch awl, rubber mallet, moisture meter.
Step-by-step:
- At any blistered or discolored area, press firmly with your thumb — spongy or hollow feel indicates delamination beneath
- Tap lightly with the rubber mallet around blisters and rust spots, listening for a hollow drum sound versus a solid response
- Use the scratch awl to gently probe coating edges at seams, testing adhesion and checking whether rust has undercut the film
Key signs to document:
- Coating that lifts cleanly from the substrate with no adhesion resistance
- Rust scale found beneath an apparently intact surface film
- Hollow sections larger than a palm width
- Elevated moisture meter readings at seam joints
Pros: Confirms subsurface failure that visual methods miss entirely. Cons: Requires physical contact — scaffolding or lift access needed for upper rings. Can disturb marginally adhered coating if probing is too aggressive.
Method 3: Instrument-Assisted Inspection
Quantified measurement of coating thickness and continuity using calibrated instruments.
Tools: Magnetic DFT gauge (ASTM D7091), holiday/spark tester (ASTM D5162-24 / NACE SP0188-2024), UT gauge (ASTM E797/E797M-21).
Step-by-step:
- Use the DFT gauge at a minimum of five points per panel (center and four edges), then compare readings against the original installation specification. Pull project records before arriving on site.
- Run the holiday tester across accessible surfaces per manufacturer voltage settings. ASTM D5162 specifies low-voltage wet sponge for coatings 20 mils or under; use high-voltage spark for thicker systems.
- If steel thinning is suspected behind a corroded area, apply the UT gauge to measure remaining wall thickness.
Key findings that require action:
- DFT readings consistently below the specified minimum indicate overall coating consumption across panels
- Holiday detector trips signal pinholes that allow electrolyte contact with bare steel
- UT readings showing steel below engineering minimums require immediate contractor escalation
Pros: Produces quantified, auditable data for inspection records and compliance reporting. Cons: Interior UT interpretation and holiday testing require a certified inspector. Not practical for first-pass surveys.
How to Interpret What You Find
Misreading findings creates two equally costly outcomes: dismissing rust staining as surface-only delays repairs until corrosion reaches the substrate, while over-reacting to minor chalking triggers unnecessary shutdowns. Use the tiers below to match what you observe to an appropriate response.
Normal / Acceptable Condition
- Uniform coating color and gloss, no blistering, no rust bleed
- DFT readings within 10% of specification across panels
- Minor surface weathering or light chalking on sun-exposed exterior panels
Next step: Document findings with reference photos, schedule next inspection per your facility rotation.
Minor Issues — Monitor and Plan
- Isolated rust staining at one or two bolt locations without coating lift
- Small blistered areas (smaller than hand-sized) with coating still adhered
- Chalking that reveals faded but intact primer beneath
These findings indicate the coating is beginning to fail, but active corrosion hasn't taken hold beneath the film yet.
Next step: Log location with photos, mark with a weatherproof paint pen, and schedule re-inspection in 60–90 days. Add to the next planned maintenance scope.
Out-of-Spec — Contractor Required
Stop the self-inspection, isolate the affected zones, and contact a qualified tank lining contractor if you find any of the following:
- Coating fully delaminated or lifted from the substrate
- Rust scale present between the coating and steel surface
- Blistering extending across multiple panels or along an entire seam line
- DFT readings below the minimum for the coating system
- Holiday tester indicating widespread pinhole density
- UT readings identifying steel wall thinning
At this stage, active corrosion is progressing into the steel wall itself. Without professional intervention, wall thinning accelerates — and what starts as a lining repair can become a structural restoration or a containment failure.
When to Call a Contractor
The dividing line between in-house monitoring and contractor engagement is defined by whether the steel substrate has been breached, whether corrosion is active beneath the coating, or whether structural integrity or compliance status is at risk.
Specific Trigger Conditions
Call a contractor when you observe:
- Coating delamination or lift-off covering more than an isolated area on any single ring
- Rust bleed or staining at three or more bolt locations on any single panel ring
- Any confirmed pinhole density from holiday testing
- Interior coating failure identified during any confined-space inspection
- Tank age exceeding the expected service life of the installed coating system without a documented recoating event
Regulatory inspection intervals reinforce these triggers. Key standards by tank type include:
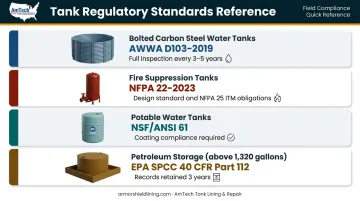
- Bolted carbon steel water storage tanks: AWWA D103-2019 requires full interior and exterior inspections every 3–5 years
- Fire suppression tanks: NFPA 22-2023 governs design and maintenance; NFPA 25 covers inspection, testing, and maintenance obligations
- Potable water tanks: Coatings must maintain NSF/ANSI 61 compliance
- Petroleum storage above 1,320 gallons aggregate: EPA SPCC regulations under 40 CFR Part 112 require regular integrity testing with records kept for at least three years
What a Qualified Contractor Inspection Delivers
A certified inspector — such as an NLPA Special Inspector — will perform a full interior and exterior assessment that typically includes:
- Holiday testing per ASTM D5162 / NACE SP0188
- DFT mapping across all panel rings
- UT wall thickness readings at suspect areas
- Structural review of bolt torque and gasket condition
- Documented report with repair prioritization
- Recoating specification for the applicable service environment
AmTech Tank Lining & Repair has NLPA-licensed inspectors on staff and field crews covering all 50 states, meaning both the assessment and the coating restoration are handled by a single contractor in one mobilization — no handoffs, no coordination gaps.
Delaying a contractor call after out-of-spec findings is more expensive than acting on them. Once oxygen and moisture reach bare steel, under-film corrosion accelerates. Rust at bolt seams can compromise panel alignment and gasket integrity — at that point, what started as a recoating project becomes a structural repair.
Safety and Best Practices
Inspection work on bolted steel tanks carries real physical risk — from fall hazards on the shell to atmospheric dangers inside. These requirements aren't optional; they define the minimum acceptable standard for anyone conducting hands-on tank assessments.
Confined Space Entry Requirements
The interior of a bolted steel tank is classified as a permit-required confined space under OSHA 29 CFR 1910.146. Before any interior entry:
- Test atmosphere in order: oxygen level first, flammable gases and vapors second, toxic contaminants third
- Assign an authorized entrant, trained attendant, and entry supervisor
- Have a rescue plan and emergency services identified before entry begins
- BLS data covering 2011–2018 recorded 205 worker fatalities in tanks, bins, and vats — each one occurred in a space someone entered without adequate controls
PPE and Environmental Controls for Exterior Inspection
| Condition | Required Control |
|---|---|
| All exterior inspections | Hard hat, safety glasses minimum |
| Flammable stored contents | FR clothing |
| Classified hazardous areas | Non-sparking tools |
| Above 4 feet on tank shell | Fall protection |
| Connected piping and mixing systems | Lockout/tagout before physical probing |
Documentation as a Compliance Practice
Log every finding — including "no issues noted" — with the following:
- Tank ID and date
- Inspector name
- Location on tank shell (compass direction and ring height)
- Photo reference for each noted condition
These records support SPCC compliance, insurance claims, and API/NFPA inspection interval tracking. SPCC inspection records must be signed and retained for a minimum of three years per 40 CFR 112.8(c)(6).
Conclusion
Bolted steel tank coating inspections follow a three-tier sequence — visual, physical, and instrument-assisted — and the bolt seams, gasket zones, and panel edges are the right starting point every time because that's where failure originates, not at the center of a panel face.
The interpretation framework matters as much as the inspection itself. Normal findings get documented and scheduled for re-inspection. Minor issues get flagged and monitored closely. Out-of-spec findings — delamination, active rust under the film, pinhole density — require an immediate contractor call.
Catching problems at the coating stage typically means a planned recoating project. Waiting until substrate damage sets in means emergency repair costs that can run several times higher. If your inspection turns up out-of-spec findings, AmTech's field crews are available nationwide to assess and restore — contact Greg Comeau at 603-315-8839 or info@amtechtanklining.com to schedule an evaluation.
Frequently Asked Questions
What should be included in the inspection checklist?
A complete bolted steel tank coating inspection checklist should cover:
- Exterior shell condition by panel and ring
- Seam and bolt-line rust staining
- Coating adhesion checks at joints
- DFT readings per panel
- Roof-to-wall connection condition
- Foundation perimeter for product staining
- Containment area status
Photo documentation at every defect location is mandatory, not optional.
How often should bolted steel tanks be inspected for coating failure?
Monthly visual walk-arounds are standard, with a thorough instrument-assisted inspection annually. AWWA D103 requires complete interior and exterior inspections every 3 to 5 years — though coastal, freeze-thaw, or corrosive-service tanks typically warrant semi-annual detailed checks.
What are the most common causes of coating failure in bolted steel tanks?
Moisture intrusion at bolt holes and gasket seams is the leading cause. Other common failure drivers include:
- UV degradation on exterior coatings
- Inadequate surface preparation during original application
- Chemical attack from stored contents
- Galvanic activity at the bolt-to-panel interface from dissimilar metals or incompatible coating systems
Can I repair coating failure on a bolted steel tank myself?
Minor surface chalking or isolated edge touch-ups are appropriate for trained maintenance staff using compatible patch materials. Any repair requiring surface preparation to bare steel, interior lining work, or coverage of delaminated seam areas should be handled by a certified tank lining contractor to ensure proper adhesion, DFT compliance, and warranty validity. Contractors like AmTech Tank Lining & Repair maintain the documentation and system certifications that in-house maintenance work cannot replicate.
How do I know if my bolted steel tank needs full relining versus spot repair?
Spot repair is appropriate when failure is isolated and the surrounding coating remains well-adhered with acceptable DFT readings. Full relining is warranted when delamination is widespread across multiple panels, DFT is below minimum in several locations, or holiday testing shows high pinhole density. A certified inspector — such as an NLPA Special Inspector — is required to make this determination based on documented readings, not visual judgment alone.
What standards govern bolted steel tank inspection and coating systems?
The primary standards depend on tank type and service:
- AWWA D103-2019: factory-coated bolted carbon steel tanks for water storage
- NFPA 22-2023 / NFPA 25: fire protection water tanks and ITM obligations
- API 653: aboveground storage tanks built to API 650
- NSF/ANSI 61: mandatory coating compliance for potable water applications