Leaks develop for predictable reasons: corrosion, coating breakdown, damaged fittings, or material fatigue. The correct repair approach depends entirely on the tank material, the leak's severity, and how long it has gone untreated.
This guide covers how to identify a water tank leak, a step-by-step repair process, repair methods by tank material, and how to decide between patching, relining, or full replacement.
Key Takeaways
- Most water tank leaks stem from corrosion, coating failure, weld seam fatigue, or damaged fittings
- Industrial and commercial tank leaks are repairable — but the method must match the tank material and leak severity
- Relining is the most durable long-term solution for tanks with widespread coating degradation
- For potable water tanks, repairs must use NSF/ANSI-compliant materials
- When patching repeatedly fails or structural integrity is in question, replacement is the right call
Common Causes and Warning Signs of Water Tank Leaks
Catching a tank leak early can mean the difference between a targeted repair and a full replacement. Watch for these warning signs:
- Unexplained drops in water level
- Moisture or seepage on the exterior surface
- Rust streaking on steel tanks
- Efflorescence (white salt deposits) on concrete tanks
- Discoloration or odor changes in stored water
- Pooling or saturation at the tank base
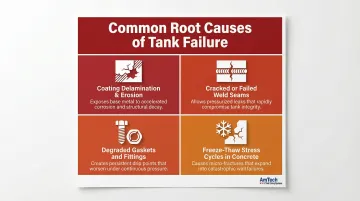
Root Causes by Failure Type
Corrosion and pitting in metal tanks is the leading cause of failure. While standard uniform corrosion rates for carbon steel in water average 0.1 mm/year to 0.2 mm/year, actual pitting rates can range from 0.5 mm/year to 1.5 mm/year, and microbiologically influenced corrosion (MIC) can progress at 0.5 mm/year to 2.0 mm/year. Localized corrosion is most aggressive during the first year of exposure.
Other common root causes include:
- Delamination or erosion of interior coatings — protective barriers fail over time, exposing substrate to attack
- Cracked or failed weld seams — structural joints weaken from stress cycling
- Degraded gaskets and fitting connections — seals deteriorate from chemical exposure or age
- Freeze-thaw stress cycles in concrete tanks — expansion and contraction cause cracking
Consequences of Delayed Action
A small pinhole leak in a steel tank can spread corrosion rapidly across the surrounding substrate. A crack in a concrete tank allows water ingress that accelerates rebar corrosion and spalling. Leaks in chemical or fuel storage tanks create environmental and safety liabilities.
According to the American Society of Civil Engineers, approximately 126 billion cubic meters (33.3 trillion gallons) of water is lost annually across 2.2 million miles of underground pipes and storage systems — representing more than $187 billion in lost revenue. The direct cost of corrosion in the water and wastewater sector alone reaches an estimated $36 billion per year in the U.S.
Different tank materials — carbon steel, stainless steel, concrete, and fiberglass/FRP — each have characteristic failure patterns. Matching the repair method to the specific failure type is what separates a lasting fix from one that fails again within months.
How to Repair a Water Tank Leak: Step-by-Step
Attempting a repair without first understanding the leak's source, extent, and root cause leads to repeat failures — often within months. The steps below walk through each phase, from leak detection through post-repair validation.
Step 1: Locate and Assess the Leak
Drain or partially drain the tank and conduct a thorough visual inspection of both the interior and exterior. Pay special attention to weld seams, penetration fittings, base plates, and any previously repaired areas.
Where the leak source is not visually obvious, use standardized detection methods:
- Vacuum box testing — required by API 650 for new shell-to-bottom welds and bottom welds
- Liquid penetrant (dye) testing — governed by ASTM E165 and permitted by API 650 for critical shell-to-bottom joints
- Tracer gas testing — alternative method for bottom weld verification
Document all compromised zones before beginning any work.
Step 2: Prepare the Repair Surface
Remove all stored liquid and clean the repair area thoroughly. Degrease, remove rust, scale, loose coating, and any contamination using mechanical grinding, abrasive blasting, or wire brushing to achieve proper surface profile for repair material adhesion.
For steel tanks, surface preparation should meet SSPC-SP5 White Metal, SSPC-SP6 Commercial Blast, or SSPC-SP10 Near-White Blast standards. For concrete tanks, remove all loose material and saturate the surface.
For live or active leaks where the tank cannot be taken offline immediately, use wet-surface-tolerant hydraulic cement or a rapid-cure epoxy plug to stop active water flow before proceeding to permanent repair.
Step 3: Apply the Repair Material
For minor pinholes or surface corrosion:
Apply industrial-grade epoxy paste or repair mortar over the cleaned area, extending coverage at least 2–3 inches beyond the damaged zone. Allow full cure time per manufacturer specifications before proceeding.
For cracked weld seams or structural failures in steel tanks:
Professional TIG or MIG welding is required to restore structural integrity. API 653 specifies that the minimum dimension for a replacement shell plate is 12 inches or 12 times the thickness of the replacement plate, whichever is greater. Grind the area to clean bare metal before welding, then inspect the weld with a dye penetrant or vacuum test.
For concrete tanks:
Inject epoxy grout into cracks and apply a polymer-modified repair mortar to the surface. Epoxy injection is effective for restoring tensile strength across dormant cracks as narrow as 0.002 inches (0.05 mm).
Step 4: Apply a Protective Interior Lining or Coating
Repairing the leak without restoring the interior coating leaves the tank vulnerable to recurrence — the exposed substrate will continue to corrode or degrade. After the repair has fully cured, apply a protective lining to the affected area, or the entire interior if coating condition is broadly degraded.
For potable water storage tanks, all repair materials and lining systems must comply with NSF/ANSI 61 standards. Recent updates to NSF 600 (effective January 2023) reduced allowable extractable levels for solvents like xylene and toluene, effectively eliminating many traditional solvent-based epoxies and pushing the industry toward 100% solids polyurea and polyurethane systems.
Professional tank lining contractors with NSF/ANSI 61 and API-compliant system certifications — covering cementitious, 100% solids epoxy, and polyurea options — can match the right lining to the tank's service conditions and return it to full service life.
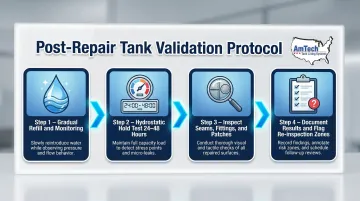
Step 5: Test and Validate the Repair
API 653 Section 12.3.1.1 mandates that a full hydrostatic test, held for 24 hours, shall be performed on a reconstructed tank or any tank that has undergone major repairs or alterations.
The testing process should include:
- Refilling the tank gradually while monitoring all repaired areas
- Conducting a full hydrostatic hold test (typically 24–48 hours)
- Checking all seams, fittings, and patched zones for any signs of seepage
- Documenting test results and noting any areas requiring re-inspection
For potable water tanks, AWWA C652 mandates full disinfection before returning to service. Method 3 requires filling the tank to 5% capacity with 50 mg/L chlorine for 6 hours, then filling to overflow and holding for 24 hours.
Establish a post-repair monitoring schedule for the first 30–90 days — early detection of any seepage reduces the risk of a full repair cycle repeating.
Repair Methods by Tank Type
Tank material is the primary factor determining which repair method will work. Using the wrong approach for the material risks repair failure or additional damage.
Steel and Stainless Steel Tanks
Carbon steel tanks are most prone to pitting corrosion and weld seam failures. Stainless steel tanks more commonly fail at fitting connections or from crevice corrosion.
For isolated pinholes:
An industrial epoxy repair compound applied to a mechanically prepared surface provides a durable short-term fix. The substrate must be cleaned to bare metal via abrasive blasting to achieve proper adhesion.
For seam or weld failures:
Professional welding is required:
- TIG welding for stainless steel
- MIG or SMAW for carbon steel
Following welding, coating restoration is essential. When corrosion extends beyond a single weld or fitting, the repair scope changes entirely.
When widespread internal corrosion is present:
Patching alone is insufficient.
Full interior relining with a compatible epoxy or polyurethane system is the appropriate long-term solution. AmTech's DuraChem® 500 series polyurethane/polyurea systems are designed for exactly this scenario — delivering up to 1,965 PSI adhesion strength and a seamless 80–125 mil thick barrier that prevents water from reaching the tank substrate.
Concrete and Masonry Tanks
Concrete tanks can leak from cracks caused by freeze-thaw cycling, settlement, or rebar corrosion-induced spalling.
Exterior repair:
Concrete water tanks can be repaired from the outside using hydraulic cement or crystalline waterproofing compounds applied to the exterior face. However, interior repair using cementitious or epoxy lining systems provides more durable results because it addresses the pressurized (water-contact) side of the tank wall.
Two repair approaches are available, each with different durability outcomes:
- Exterior repair — hydraulic cement or crystalline waterproofing applied to the outside face; faster to access but does not address water-side pressure
- Interior relining — cementitious or epoxy systems applied from inside the tank; superior long-term durability for active water-contact surfaces
Interior relining:
For large municipal concrete tanks, a full cementitious relining — such as AmTech's proprietary HydraStone Alkrete system — rehabilitates the entire interior surface, sealing existing cracks and protecting against future deterioration. The system is applied at a minimum thickness of 5/8 inch.
Fiberglass and FRP Tanks
Fiberglass tanks typically fail through delamination, stress cracking near fittings, or impact damage.
Laminate repair process:
- Cut out the damaged laminate
- Grind back to sound material
- Apply a compatible fiberglass patch kit with resin
- Sand the repair flush and inspect for voids
For large-area damage or aging fiberglass tanks, an interior spray-applied lining system compatible with FRP substrates offers a more durable solution than repeated patching. The AT BiFlex® system from AmTech uses compatible glass, Kevlar, and carbon veils to restore the corrosion barrier — without requiring full tank replacement.
When to Repair, Reline, or Replace Your Water Tank
The decision between patching, relining, or replacing a water tank is a cost, risk, and service-life calculation. Always weigh repair costs against the tank's remaining service life and the downstream costs of a future failure — including downtime, emergency response, and potential regulatory exposure.
For large municipal infrastructure, the math is well-documented. A life-cycle cost analysis conducted by Black & Veatch for water tower replacement evaluated multiple tank styles over a 60-year period and found that multi-column tanks carry the lowest initial capital cost ($1,226,000 for a 0.5 MG tank) but significantly higher long-term maintenance costs ($333,000 NPV) compared to composite tanks ($258,000 NPV). The pattern holds at smaller scale: cheaper upfront decisions often compound into costlier outcomes.
Repair (Patch) Is Appropriate When:
- The damage is isolated to a single location
- The tank structure and remaining coating are otherwise sound
- The tank has significant remaining service life
Patching individual fittings, pinhole leaks, or small cracks in a well-maintained tank is cost-effective and quick.
Reline Is Appropriate When:
- Interior coatings are broadly failing or delaminating
- Corrosion has affected multiple zones
- Repair patches have failed repeatedly
Relining — with cementitious, epoxy, or fiberglass systems — restores the tank's full interior protection without the capital cost of replacement. In 98% of cases, tanks with structural integrity intact can be returned to full useful life expectancy after professional relining. A professional relining engagement covers the full scope: inspection, surface preparation to industry standards, application of NSF/ANSI 61-compliant materials, and documented post-repair testing — all backed by a warranty program like AmTech's Blue Check.
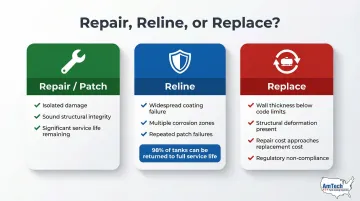
When Replacement Is the Only Option:
- Wall thickness has been reduced beyond serviceable limits (confirmed by ultrasonic thickness testing)
- The tank structure shows deformation or irreparable seam failure
- The cost of repair or relining approaches or exceeds replacement cost
- The tank no longer meets applicable regulatory requirements for the intended service
API 653 Section 4.4.7.1 specifies that minimum bottom plate thickness in the critical zone (within 3 inches of the shell) must be the smaller of ½ the original bottom plate thickness or 50% of the minimum thickness of the lower shell course — but never less than 0.1 inch.
When measurements fall below these thresholds, replacement isn't a judgment call. It's code-required.
How to Prevent Water Tank Leaks in the Future
Preventive maintenance is the lowest-cost strategy for avoiding leak-related failures.
Establish a Documented Inspection Program
API 653 inspection intervals:
- Routine in-service external inspections must be conducted monthly
- Formal external visual inspections by an authorized inspector must occur at least every 5 years
- Internal inspection intervals are determined by corrosion rates but must never exceed 20 years (or 10 years if corrosion rates are unknown)
AWWA D100 recommendations: Inspection of the interior and exterior of the entire tank with corrective maintenance at 3-year intervals
At each inspection, look for early coating degradation, surface rust, fitting wear, and seam condition.
Maintain Interior Protective Coatings Proactively
Recoat or reline before coating failure reaches the substrate. Waiting until active corrosion is visible sharply increases the cost and scope of restoration.
Industry best practices define two distinct maintenance windows:
| Reline Period | Tank Age | Recommended Action |
|---|---|---|
| Ideal | 0–20 years | Regular inspection, cleaning, and sacrificial anode replacement |
| Critical | 20+ years | Prompt relining — existing linings are deteriorated or fully failed |
Train Maintenance Personnel
Train staff to recognize early warning signs and maintain repair records for every tank in the facility. Documentation supports regulatory compliance, informs future maintenance decisions, and identifies tanks approaching end of serviceable life.
Leaks caught early are repair jobs. Leaks caught late become capital replacement projects. The right diagnosis, matched to the correct repair method and a proactive relining schedule, can extend a tank's service life by decades — and defer hundreds of thousands of dollars in replacement costs.
Frequently Asked Questions
Can a leaking water tank be repaired?
Yes, most water tank leaks can be repaired. The method depends on the tank material, leak size, and severity of underlying corrosion or structural damage. Small cracks and pinholes can often be patched; widespread coating failure typically calls for relining.
Can you repair a concrete water tank from the outside?
Exterior repairs using hydraulic cement or crystalline waterproofing compounds are possible, but interior relining typically provides more durable protection since it addresses the pressurized side of the tank wall.
What is the greatest concern posed by a leaking storage tank?
Key risks include structural deterioration from ongoing corrosion, contamination of stored water (especially in potable water systems), environmental liability for fuel or chemical tanks, and regulatory non-compliance.
How do you know if your water storage tank is leaking?
The most reliable indicators are unexplained water level drops, exterior moisture or seepage, rust staining, efflorescence on concrete surfaces, and changes in water quality or odor.
What is the best method for repairing an industrial water tank?
The best method depends on tank material and leak type:
- Steel seam failures: structural welding
- Concrete tanks: cementitious or epoxy patching
- FRP tanks: fiberglass repair systems
In all cases, applying a compatible interior lining after the repair prevents recurrence and extends service life.
How long does a water tank leak repair last?
A properly executed repair, followed by a compatible protective lining, can last 10–20+ years in many industrial applications. Patch-only repairs without coating restoration typically have shorter service lives and are more likely to fail sooner and need retreatment.