Key Takeaways
- Stock tanks leak from physical damage, corrosion, seam failures, or faulty fittings — each calling for a different repair approach
- Small, isolated leaks can be patched with epoxy, sealant compounds, or fitting and valve replacements
- Severe corrosion, multiple failure points, or structural compromise are signs a tank needs replacement
- For large or commercial-grade tanks, professional tank lining extends service life by decades — far longer than patch repairs alone
What Causes Stock Tanks to Leak?
Most stock tank leaks fall into four predictable categories. Identifying the right one before reaching for a repair product saves time and money.
Physical Damage
Freeze-thaw cycles, ice-breaking impact, livestock contact, and accidental punctures cause cracks or holes in both metal and plastic tanks. Impact damage typically appears as a discrete puncture, dent, or crack with clean edges and visible deformation. This distinguishes it from the irregular, pitted appearance of corrosion or the linear pattern of seam failures.
Corrosion and Rust
Galvanized metal tanks are vulnerable to oxidation when exposed to hard water minerals, copper sulfate algae treatments, or salt-based feed supplements. Copper sulfate is particularly aggressive — it accelerates zinc loss by up to 7x and iron loss by 55x through deposition corrosion, per research published in CORROSION.
Rust typically starts at seams and base edges, where standing water creates constant exposure.
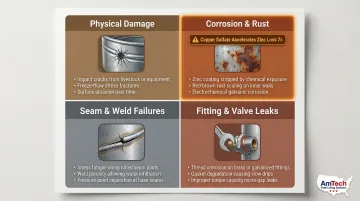
Seam and Weld Failures
Factory seams and welded joints experience repeated stress from thermal expansion, water pressure, and fill/drain cycles. Leaks here often appear as a slow weep rather than a visible crack, making them harder to detect but equally damaging.
Fitting, Float Valve, and Drain Plug Leaks
Leaks often originate not from the tank wall itself, but from connections : loose or corroded drain plugs, degraded gaskets on float valves, or improperly sealed inlet fittings. Checking these first takes minutes and rules out the simplest fixes before any repair work begins.
How to Find Exactly Where Your Stock Tank Is Leaking
Three methods cover most leak-location scenarios:
Drain-and-Dry Method
Lower the water to a few inches, dry the exterior surface completely, and watch for moisture trails, rust streaks, or mineral deposits tracing back to a specific point. This works best for visible cracks and seam failures.
Dye Test
Add a small amount of food-safe or leak-detection dye to the water and watch for color seeping through the tank wall or hardware connections. Use this for hairline cracks invisible to the naked eye.
Check Fittings First
Before assuming a structural crack, inspect drain plugs, float valve connections, and inlet fittings. A loose plug or worn washer is responsible for more apparent "leaks" than you'd expect — and takes minutes to fix.
How to Repair a Leaking Stock Tank
Applying any repair product to a wet, dirty, or corroded surface will cause it to fail quickly. Proper prep is the foundation of any lasting repair. The six steps below cover surface preparation through final validation — work through them in sequence for the best result.
Step 1: Drain, Clean, and Prep the Surface
Fully drain the tank and scrub the interior and repair area with a stiff brush to remove algae, mineral scale, and debris. For metal tanks:
- Use a wire brush or sandpaper to remove rust and flaking paint around the leak site
- Remove all loose material until you reach solid metal
- Wipe dry and allow to fully dry before applying any repair product — even slight moisture will prevent adhesion
Step 2: Repair Small Holes and Minor Cracks
For pinhole leaks and small cracks (under ¼ inch):
- Apply a two-part epoxy compound such as J-B Weld WaterWeld, which is NSF/ANSI 61 certified for potable water contact
- Mix per product instructions
- Apply from both inside and outside the wall if accessible
- Smooth the surface to ensure full contact and prevent air pockets that compromise the seal
- Allow full cure time before refilling — typically 15–24 hours

Note: Flex Seal products are explicitly not recommended for drinking water contact and should not be used on livestock water tanks.
Step 3: Repair Seam and Weld Failures
For leaking seams on metal tanks:
- Apply a metal-grade seam sealer or cold-weld compound along the entire joint, not just the visible wet spot
- For larger or pressurized tanks, consult a certified welder for professional repair
- Before sealing, treat any active corrosion with a rust converter — skipping this step almost guarantees the seam will fail again
Step 4: Fix Fitting, Valve, and Drain Plug Leaks
- Drain the tank and remove the fitting or plug
- Inspect the rubber washer or gasket and replace if cracked or compressed
- Reinstall with thread sealant tape (PTFE) on threaded connections
- If the tank wall around the fitting has corroded or deformed, a repair plate or replacement fitting with a backing washer may be needed
Step 5: Address Corrosion Damage with a Protective Coating
For tanks with widespread surface rust or pitting — particularly galvanized steel tanks that have lost their zinc coating:
- Apply a rust converter to neutralize active corrosion
- Coat the affected area with a potable-water-safe coating or epoxy liner
- For commercial or industrial-scale stock tanks, contractors like AmTech Tank Lining & Repair apply field-grade systems such as DuraChem® 500 series poly linings or Armor Shield® tank linings that seal the interior surface and extend service life by decades
Step 6: Test and Validate the Repair
With all repair work complete, the final step is confirming the fix holds before returning the tank to service.
- Refill the tank slowly and monitor the repair site closely for the first 30–60 minutes
- Check again after 24 hours and after the first temperature change
- Confirm there is no seepage, discoloration, or moisture around the repaired area before returning the tank to full use
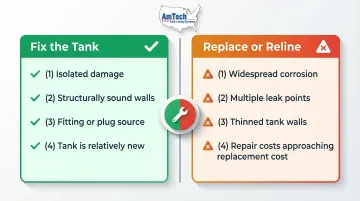
When to Fix vs Replace a Leaking Stock Tank
Not every leaking stock tank needs to be scrapped. The right call depends on how far the damage has spread, whether the remaining tank wall is structurally sound, and whether repair costs make financial sense over continued service life.
Fix the tank when:
- Damage is isolated to one area
- The rest of the tank wall is structurally sound
- The leak source is a fitting or plug
- The tank is relatively new or has significant remaining service life
Replace when:
- Corrosion has spread across multiple wall sections or the base
- There are more than two or three separate leak points
- The tank wall has thinned significantly from rust pitting
- Cumulative repair costs are approaching what a replacement would run
That said, full replacement isn't always the only alternative. For large industrial or agricultural stock tanks, professional relining is often far more cost-effective — and epoxy relinings can add 10 to 30 years of service life. AmTech Tank Lining & Repair has been performing structural tank restoration and field-applied lining work since the late 1960s, with crews available across all 50 states for exactly these assessments.
Preventing Stock Tank Leaks Before They Start
Preventing Stock Tank Leaks Before They Start
Most stock tank leaks are avoidable. A consistent prevention routine — covering winterization, cleaning, and protective coatings — extends tank service life and eliminates the cost and downtime of emergency repairs.
Winterize to Prevent Freeze Damage
- Use a tank heater rather than breaking ice mechanically
- Insulate exposed piping, fittings, and valve connections before freezing temperatures arrive
- Inspect the tank each spring for frost damage before refilling
- Active mixing systems keep water circulating, maintain open surfaces, and relieve outward ice pressure on tank walls
Clean Regularly
Algae, mineral deposits, and organic buildup accelerate corrosion — especially in metal tanks. A monthly cleaning schedule during warm months removes these before they cause structural damage.
- Avoid copper sulfate or other corrosive algae treatments in metal tanks
- Use approved biocides or cleaning agents appropriate for your tank's material and contents — consult NSF or AWWA guidelines for potable and industrial water tanks
Apply Protective Coatings
- Apply a protective interior lining to bare metal tanks every few years as a proactive measure
- Interior coatings create a chemical barrier between the metal substrate and stored contents, directly reducing corrosion rates and extending service life
Frequently Asked Questions
Do stock tanks leak?
Yes, stock tanks commonly develop leaks over time due to corrosion, physical damage, freeze-thaw stress, and fitting degradation. Catching leaks early keeps repair costs low and avoids extended downtime from a full tank failure.
How do you find a leak in a stock tank?
Use the drain-and-dry visual method or a food-safe dye test to trace moisture back to its source. Always check fittings and drain plugs first before assuming a wall crack, as these account for many apparent leaks.
Can you use Flex Seal or JB Weld on a stock tank?
JB Weld WaterWeld is NSF/ANSI 61 certified for potable water contact and works well for minor cracks on clean, dry surfaces. Flex Seal is explicitly not approved for drinking water contact and should not be used on livestock tanks.
What causes a galvanized stock tank to rust and leak?
Zinc coating wear, prolonged water exposure, algae treatment chemicals (especially copper sulfate), and standing water at the base are the main corrosion accelerators. Hard water naturally protects galvanized steel, while soft water (<17 ppm) rapidly strips the zinc coating.
How long does a stock tank repair last?
DIY epoxy and sealant repairs can last 1–3 seasons on a properly prepared surface. Professional coatings and lining systems can extend tank life by 10–20+ years — a measurable difference when weighed against repeated short-term patch costs.
When should I replace a leaking stock tank instead of repairing it?
Replace or professionally reline when corrosion is widespread, multiple leaks are present, or the tank wall has structurally thinned. For large tanks, relining is often more economical than full replacement and can restore decades of service life.