Introduction
Plastic gas tanks power a surprising range of equipment—motorcycles, ATVs, lawn mowers, marine vessels, and even some passenger vehicles. Prized for their light weight and rust resistance, these tanks are far from indestructible. Over time, they develop cracks, pinholes, and impact damage that can leave you with fuel stains on the driveway and a persistent odor that won't quit.
This guide walks you through identifying the leak, choosing the right repair method, executing the fix safely, and knowing when replacement is the smarter call. Whether you're dealing with a hairline crack or a puncture from debris, you'll learn the exact steps to restore your tank, or recognize when walking away is the right move.
Key Takeaways
- Plastic gas tanks can be repaired with epoxy, plastic welding, or fiberglass patches
- Drain completely and prep the surface before starting any repair method
- Small cracks respond well to fuel-resistant two-part epoxy; larger damage requires plastic welding or a fiberglass patch
- Replace tanks with seam failures, widespread cracking, or structural warping
- Always pressure-test the repair before reinstalling
Common Signs of a Plastic Gas Tank Leak (and How to Find One)
Visible symptoms:
- Fuel stains or wet spots beneath the vehicle
- Persistent fuel odor, especially after parking
- Unexplained fuel loss without increased usage
- Visible cracks or discoloration on the tank surface
Two reliable detection methods:
- Visual inspection — Work in good lighting and gently flex the tank to reveal hidden hairline cracks. Check for stress marks near mounting points and fittings, where pressure concentrates.
- Soapy water pressure test — Seal all openings except one, apply 2-3 PSI of air, then spray soapy water across the surface. Bubbles pinpoint the exact leak location, including pinholes that visual inspection misses.
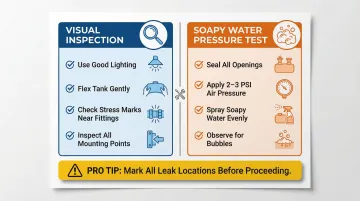
Mark every leak location with a grease pencil or tape before moving to repairs. Tanks often develop multiple failure points simultaneously, so a complete pass over the entire surface during this step prevents surprises mid-repair.
Before You Begin: Essential Safety Steps
Gasoline vapor is extremely flammable, and improper handling creates serious fire and explosion risk.
Mandatory precautions:
- Disconnect the vehicle's battery to eliminate spark risk
- Work outdoors or in a well-ventilated space
- Keep all ignition sources away—no open flames, cigarettes, or spark-producing power tools
- Use an approved container for drained fuel
Required PPE:
- Nitrile gloves (protect against fuel and epoxy)
- Safety glasses
- Respirator or fresh air ventilation
Use a siphon pump to drain fuel—never mouth suction. Remove the tank completely before starting any repair. Attempting repairs on an installed tank creates three compounding problems:
- Inadequate surface prep (fuel residue prevents adhesion)
- Active spark risk near pressurized fuel lines
- No way to pressure-test the repair afterward
How to Repair a Leak in a Plastic Gas Tank (Step-by-Step)
The right method depends on damage type and size:
- Epoxy: Pinholes and hairline cracks
- Plastic welding: Medium cracks
- Fiberglass patch: Large holes or structurally compromised areas
All methods share the same critical first steps.
Step 1: Drain, Remove, and Locate the Leak
Siphon all fuel into an approved container, then remove the tank following the manufacturer's procedure. Allow it to fully dry inside and out, since residual vapor is a fire hazard during surface prep.
Once the tank is dry and in a well-lit workspace, use the soapy water pressure test to confirm the exact leak location and mark it clearly. Check surrounding areas for secondary cracks or stress marks that could fail later.
Step 2: Prepare the Damaged Surface
Roughen the plastic around the damage using 80-grit sandpaper, extending at least 2 inches in every direction. Unsanded plastic won't bond reliably with any adhesive.
For cracks: Use a rotary tool with a V-shaped bit to grind a shallow V-groove along the crack before sanding. This increases bonding surface area and creates a mechanical lock that prevents peeling under vibration or fuel pressure.
Wipe the entire prepped area with isopropyl alcohol on a clean cloth to remove sanding dust, oils, and residue. Do not use acetone or brake cleaner, as both can weaken plastic. Allow the surface to dry completely before applying adhesive.
Step 3: Choose and Apply Your Repair Method
Method 1: Fuel-Resistant Epoxy (Best for Pinholes and Hairline Cracks)
Select a two-part liquid epoxy explicitly rated for fuel resistance, gasoline and ethanol exposure, and HDPE plastic compatibility. General-purpose 5-minute epoxy breaks down on contact with fuel.
Mix resin and hardener at the exact ratio specified by the manufacturer. An incorrect ratio produces a soft, brittle, or uncured patch.
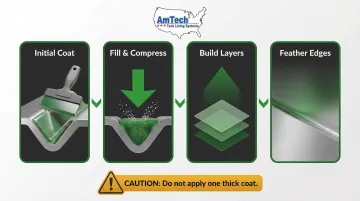
Apply the epoxy in this sequence:
- Spread a thin initial coat into the V-groove and over the sanded area using a clean spreader
- Press firmly to fill every scratch and push out trapped air
- Build the patch with multiple thin overlapping coats rather than one thick application
- On the final coat, feather the edges flush with the tank surface to eliminate stress points
Method 2: Plastic Welding (Best for Larger Cracks)
Use a plastic welder fitted with a rod that matches the tank's plastic type. Most fuel tanks are HDPE, so confirm this before purchasing rods. Wear a welding helmet and gloves throughout.
Run the weld bead along the full length of the crack from one end to the other. Cross the rod back over the area to fill completely. Allow the weld to set fully before sanding smooth. Finish with a light coat of fuel-resistant epoxy over the weld for added fuel impermeability.
Method 3: Fiberglass Patch with Epoxy (Best for Holes and Structural Cracks)
Mix a two-part fuel-resistant epoxy and apply it around the full perimeter of the hole. Cut a fiberglass patch large enough to overlap the hole by at least one inch on all sides. Press it firmly into the wet epoxy and apply a second coat over the patch to saturate it fully.
Allow to cure fully per the manufacturer's timeline, then sand smooth. This method typically requires the longest cure time of the three, but produces the most structurally durable result.
Step 4: Cure, Test, and Reinstall
Allow the repair to cure fully at room temperature. Most fuel-resistant epoxies require 24 hours to reach full chemical strength. Ideal curing temperature is 70°F to 80°F. Use a heat lamp at a safe distance if the workspace is cold.
Once fully cured, perform the soapy water pressure test again (2-3 PSI max) over the entire repair area. Any bubbles indicate a gap that must be re-sanded, cleaned, and patched before reinstalling. Only reinstall the tank after it passes the bubble test completely.
When to Repair vs. Replace Your Plastic Gas Tank
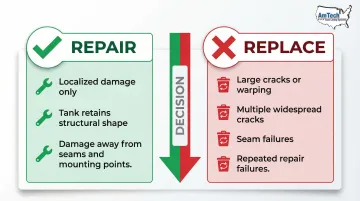
Repair is appropriate when:
- Damage is localized (one or two small cracks, pinholes, or minor punctures)
- Tank retains overall shape and structural integrity
- Damage is not at a factory seam or mounting point
Replace the tank when:
- Large cracks, severe crushing, or warping exist
- Multiple cracks spread across a wide area
- Seam failures occur
- Repeated repair failures indicate material fatigue
Cost Considerations
For small equipment (ATVs, lawn mowers), replacement tanks typically cost $50–$200, making DIY repair attractive for minor damage. For motorcycles and marine vessels, replacement tanks can exceed $500–$1,000, making professional-grade epoxy repair ($30–$50 in materials) highly cost-effective.
Large Commercial and Industrial Fuel Storage
The repair calculus changes entirely at commercial and industrial scale. For operators managing large aboveground or underground fuel storage tanks in commercial, industrial, agricultural, or municipal settings, DIY patching is not a viable solution.
Professional tank lining services from companies like AmTech Tank Lining & Repair provide engineered coatings and structural relining systems that extend tank service life by decades and meet ANSI, NSF, and API compliance requirements. AmTech's DuraChem® 500 series polylining and HydraStone Alkrete® cementitious linings are specifically engineered for petroleum storage applications.
EPA regulations (40 CFR Part 280) require that repairs to regulated underground storage tanks follow recognized codes of practice from organizations like API and NFPA, prohibiting uncertified DIY methods for large commercial tanks.
When regulatory exposure or safety risk makes field-level repair necessary, professional services include ultrasonic testing, structural steel repair, surface preparation, and application of certified lining systems — all performed by engineer-led crews.
Common Mistakes to Avoid + How to Prevent Future Leaks
Critical mistakes:
- Attempting repair with the tank still installed—prevents proper prep and creates fire hazard
- Using the wrong epoxy product (general-purpose or non-fuel-rated adhesives degrade on contact with gasoline)
- Skipping the post-repair leak test before reinstalling
- Applying repair materials to wet, oily, or insufficiently sanded surfaces—leads to bond failure within days
Long-term prevention:
- Inspect for hairline cracks, stress marks near mounting points, and UV degradation at least once a season
- Store equipment with tanks empty or full (not partially filled) to minimize condensation and oxidation
- When replacing any fitting, bracket, or fuel line, check surrounding plastic for stress cracking caused by installation torque
A periodic visual inspection combined with a soapy water pressure test catches leaks early—a pinhole found during a seasonal check costs minutes to address; the same defect ignored can mean replacing the tank entirely.
Frequently Asked Questions
Can plastic gas tanks be repaired?
Yes, plastic gas tanks can be repaired when damage is localized—small cracks, pinholes, or minor punctures—and the tank's overall structure is intact. Fuel-resistant two-part epoxy, plastic welding, and fiberglass patching are the three main methods.
Is it safe to repair a plastic gas tank yourself?
DIY repair is safe when proper precautions are followed: the tank is fully removed and drained, the work area is well-ventilated, all ignition sources are eliminated, and appropriate PPE is worn. Never attempt repairs on an installed tank — residual vapor alone creates serious ignition risk.
What is the best product to seal a plastic gas tank?
A two-part liquid epoxy specifically rated for fuel resistance and HDPE plastic compatibility is your best option for a permanent seal. General-purpose epoxies, Flex Seal, and Teflon tape degrade when exposed to gasoline and should not be used.
How long will an epoxy repair on a plastic gas tank last?
A properly executed epoxy repair (fuel-rated product, correct mixing ratio, thorough surface prep) can last the life of the tank. Premature failures almost always trace back to using the wrong product or skipping surface preparation.
Can you repair a plastic gas tank without removing it from the vehicle?
No. An installed tank cannot be fully drained, properly prepped, or safely worked on due to residual fuel vapor near electrical components. Removal is required for both a safe working environment and a repair that will actually hold.
When should a cracked plastic gas tank be replaced instead of repaired?
Replace the tank when damage involves large structural cracks, seam failures, multiple or widespread cracks, warping, or crushing. Any compromise to the tank's shape or mounting integrity puts repair beyond what any product can reliably fix.