This guide covers the most common causes of hot water tank leaks, how to diagnose the source by location, a step-by-step repair process, and a clear framework for deciding when to fix, reline, or replace the tank entirely.
Key Takeaways
- Most leaks originate from the drain valve, T&P relief valve, inlet/outlet connections, or internal tank corrosion
- Leaks from fittings and valves are usually repairable; leaks from the tank wall itself typically indicate deeper corrosion or structural failure
- Cutting power/gas and cold water supply before any repair prevents scalding, electrical hazards, and additional water damage
- Commercial and industrial tanks with chronic leaks are often candidates for professional relining — restoring decades of service life at far less than replacement cost
- Persistent leaks or leaks originating from the tank body warrant a licensed professional — delays risk structural failure and regulatory non-compliance
Common Causes of Hot Water Tank Leaks
All hot water tanks store and heat water under pressure. That constant thermal cycling and pressure stress make leaks predictable over time—not random events. The key is knowing what to look for before a small drip becomes a major failure.
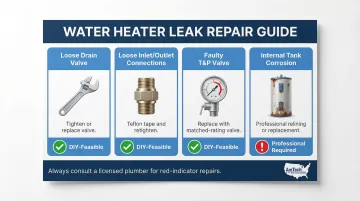
Loose or Faulty Drain Valve
The drain valve is the most common and most manageable leak source. It sits at the tank base and is used for flushing sediment. Over time, the valve seat can wear or the body can become loose, allowing water to drip steadily even when closed.
Symptoms: Water pooling directly beneath the valve spigot, often mistaken for a tank leak. The fix is usually valve tightening or replacement.
Failing Temperature & Pressure Relief (T&P) Valve
The T&P valve is a safety device designed to release water if internal pressure or temperature exceeds safe limits. Industry standards (ANSI Z21.22/CSA 4.4) mandate T&P relief valves discharge at a maximum of 150 psi and 210°F.
A valve that drips continuously is either sensing a genuine over-pressure condition or has worn internal seals and needs replacement.
Water trickling from the discharge pipe on the side of the tank is the key indicator. A constantly open T&P valve can also signal a dangerous over-pressure condition requiring immediate attention.
Loose or Corroded Inlet/Outlet Connections
The cold water inlet and hot water outlet connections at the top of the tank are threaded fittings subject to thermal expansion and corrosion. Loose threads or degraded seals allow water to weep at the joint.
Moisture or mineral deposits around the pipe connections at the top of the unit — often appearing as white or rust-colored staining — typically confirm this as the source.
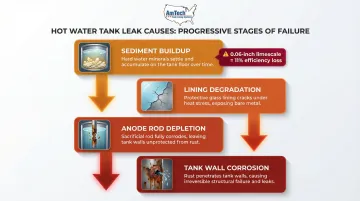
Internal Tank Corrosion and Lining Degradation
The interior of most tanks is protected by a glass or enamel lining plus a sacrificial anode rod. Once the lining cracks or the anode rod is fully depleted, bare steel is exposed to water, causing rust and pitting that penetrates the tank wall.
Symptoms:
- Rust-colored hot water at taps
- Rumbling or popping sounds during heating
- Water appearing at the base of the tank not linked to the drain valve
At this stage, the tank typically requires full relining or replacement — surface repairs alone won't stop progressive corrosion.
Sediment Buildup and Excess Pressure
Sediment buildup is also a direct contributor to the lining degradation described above. Mineral deposits accumulate at the tank bottom, insulating the heating element and triggering localized overheating. That heat stress weakens the lining and can elevate system pressure, accelerating failure at weak points throughout the tank.
Research from Pacific Northwest National Laboratory shows that a 0.06-inch coating of lime scale on a heat exchanger can reduce efficiency by an average of 11%.
For electric storage water heaters specifically, efficiency holds until sediment buries the bottom element — at which point it overheats and accelerates tank failure from the inside out.
Where Is the Leak Coming From?
The physical location of the leak is the fastest diagnostic clue—it narrows down the likely component before any tools are picked up.
Leaking from the Top
Causes:
- Loose cold water inlet or hot water outlet connections
- Faulty inlet shut-off valve
- Condensation misidentified as a leak
Top leaks are usually component-level repairs—tightening connections or replacing a valve—and rarely require tank replacement.
Action: Dry the area thoroughly, then inspect connections and the valve seat under running conditions to confirm the source before attempting any tightening or sealing.
Leaking from the Side
Causes:
- Actively discharging T&P relief valve (discharge pipe wet or lever dripping continuously)
- Defective valve that can no longer hold pressure
- System pressure or temperature running above safe operating range
Action: Check the thermostat setting first. For commercial facilities, the CDC recommends storing hot water above 140°F (60°C) to control Legionella, with thermostatic mixing valves installed to deliver safe temperatures at fixtures. If temperature is within normal range and the valve still leaks, replacement by a licensed technician is required—never cap or bypass the T&P valve.
Leaking from the Bottom
Causes:
- Loose or damaged drain valve (repairable)
- Internal corrosion that has breached the tank wall (requires tank replacement or structural relining for commercial and industrial units)
Bottom leaks originating from the tank body are the most serious and warrant immediate action.
Action: Check whether water is dripping from the drain valve spigot or seeping from the tank wall or weld seam. If the tank wall is the source, shut off water and power immediately and contact a professional.
How to Fix a Leaking Hot Water Tank (Step-by-Step)
Attempting repairs without first isolating the source of the leak and shutting off the energy supply is dangerous—hot water under pressure can cause severe burns, and electrical or gas hazards are real. Diagnosis always comes first.
Step 1: Shut Off Power and Water Supply
For electric tanks: Locate the dedicated circuit breaker and switch it off.
For gas tanks: Turn the gas valve or dial on the unit to the "Pilot" or "Off" position—avoid fully shutting the main gas valve unless necessary, as it can be difficult to relight safely.
Water supply: Close the cold water shut-off valve above the tank (turn clockwise). If inaccessible, use the main building water supply shut-off to stop flow into the unit.
Step 2: Identify and Confirm the Leak Source
Dry the exterior of the tank and surrounding area completely, then run the system briefly or allow pressure to build. Observe where new moisture appears first—this confirms the source and prevents misdiagnosis (condensation near a cold pipe can be mistaken for a tank leak).
Note the location and appearance of the leak before doing anything else:
- Dripping valve or wet threads — typically DIY-repairable
- Seeping weld or corrosion staining — warrants a professional assessment
- Active spray or pooling — shut down fully and call a contractor
Step 3: Apply the Appropriate Fix
Loose drain valve: Tighten with a wrench in small increments—avoid overtightening, which strips threads. If the valve body is corroded or cracked, drain the tank partially (using a garden hose to a floor drain) before replacing the valve entirely.
Loose inlet/outlet connections: Shut off water fully, dry the threads, and apply Teflon (plumber's) tape or pipe thread compound before reassembling. Tighten snugly without forcing.
Faulty T&P valve: Replace with an identically rated valve (match BTU/pressure rating stamped on the old unit). This task involves draining some water from the tank and is best done by a licensed plumber if you're not experienced with relief valves.
Internal tank corrosion for commercial or industrial tanks: For large-volume commercial or industrial hot water tanks where the interior lining has failed, professional tank relining can restore the tank's service life at a fraction of replacement cost. Companies like AmTech Tank Lining & Repair provide field-applied relining services using NSF/ANSI 61-compliant systems such as epoxy or cementitious coatings (AWWA D102-24 standards).
Step 4: Refill, Restore Power, and Test
Close the drain valve (if opened) and reopen the cold water supply. Allow the tank to fill completely before restoring power or gas. Energizing a partially filled electric tank will burn out the heating element.
Monitor the repaired area for 24–48 hours under normal operating conditions. Watch for returning moisture, unusual pressure sounds, or discolored water. If none appear within 48 hours, the repair is complete.
Fix vs. Replace: How to Decide
The age of the tank, severity of the failure, and cost of repair relative to replacement value all factor in. A $50 drain valve repair on a 4-year-old tank is always worth doing, but the same logic doesn't apply to a corroded 15-year-old tank.
Repair is the right call when:
- The leak is isolated to an external component (valve, fitting, connection)
- The tank is fewer than 8–10 years old
- There are no signs of internal rust or sediment-driven corrosion
- Repair cost is well below 50% of replacement cost
According to the U.S. Department of Energy, the average lifetime for commercial gas-fired storage water heaters is 10 years, while circulating water heaters and hot water supply boilers average 25 years.
Replace the tank when:
- The tank body itself is leaking (corrosion through the wall)
- The unit is past its expected service life
- Multiple components are failing simultaneously
- Repair costs approach or exceed replacement cost
For large commercial or industrial tanks, though, the repair-or-replace decision isn't always binary. A third option is worth considering.
Professional relining of the tank interior using high-performance coatings can restore structural integrity and extend service life by decades. According to cost comparisons in the tank maintenance industry, relining typically runs less than full replacement because it eliminates the need to dismantle the existing structure and manage the resulting waste.
Preventive Maintenance to Avoid Future Leaks
Annual Flush and Sediment Drain
Flushing the tank once per year removes mineral sediment from the bottom, reducing localized overheating, pressure stress, and the accelerated corrosion it causes. Manufacturer manuals recommend flushing at six-month intervals.
How to flush safely:
- Attach a garden hose to the drain valve.
- Direct the hose to a floor drain or safe discharge point.
- Open the valve briefly to expel accumulated sediment, then close.
Anode Rod Inspection Every 2–3 Years
The sacrificial anode rod (typically magnesium or aluminum) is the tank's primary defense against internal corrosion. Once it's consumed, the steel tank wall is exposed. A.O. Smith commercial storage tank manuals recommend anode rod inspection annually, with replacement when more than six inches of the core wire is exposed at either end. Artificially softened water accelerates anode consumption, so softened water demands more frequent inspections — check the rod annually rather than every two to three years.
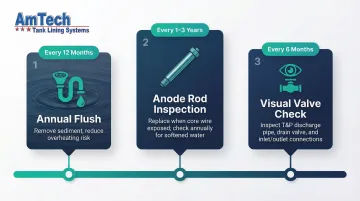
Regular Visual Inspection of Valves and Connections
Check the T&P valve discharge pipe, drain valve, and inlet/outlet connections every 6 months for mineral deposits, rust staining, or moisture. Catching a small weep early prevents a component failure from becoming a flood.
Frequently Asked Questions
Can a leaking hot water tank be repaired?
It depends on the source. Leaks from valves, fittings, or connections are generally repairable. Leaks originating from the tank wall due to internal corrosion often mean replacement — though large commercial and industrial units are frequently candidates for professional relining instead.
How much does it cost to fix a hot water tank leak?
Costs vary widely by component and tank size. Valve or fitting repairs are typically the lowest-cost fixes, while T&P valve replacements, structural repairs, or full relining of commercial tanks run considerably higher. A professional assessment is the most reliable way to scope the work and budget accurately.
Can I still use my hot water heater if it's leaking?
Any active leak should be treated as urgent. A minor valve drip poses less immediate risk than a tank-body leak, but continued operation risks water damage, accelerated corrosion, and potential system failure — especially in commercial or industrial settings where tank volumes are large.
What should I do if my hot water tank is leaking from the bottom?
First determine whether water is coming from the drain valve (repairable) or the tank wall itself (which often requires relining or replacement). Shut off power and water supply immediately while making that determination.
What should I do if my hot water heater is leaking from the top?
Top leaks are almost always caused by loose inlet/outlet connections or a faulty shut-off valve, both of which are repairable. Turn off power, dry the area, identify the exact fitting, and tighten or replace as needed.
How long will a hot water tank last once it starts leaking?
A valve or fitting leak doesn't shorten tank life if repaired promptly. A tank-body leak from corrosion signals the unit is nearing end of life. Without intervention, deterioration can progress rapidly — commercial tanks with significant internal corrosion may fail within weeks to a few months.